※この記事は公開から時間が経っているため、現在の環境とは内容が異なる場合があります。
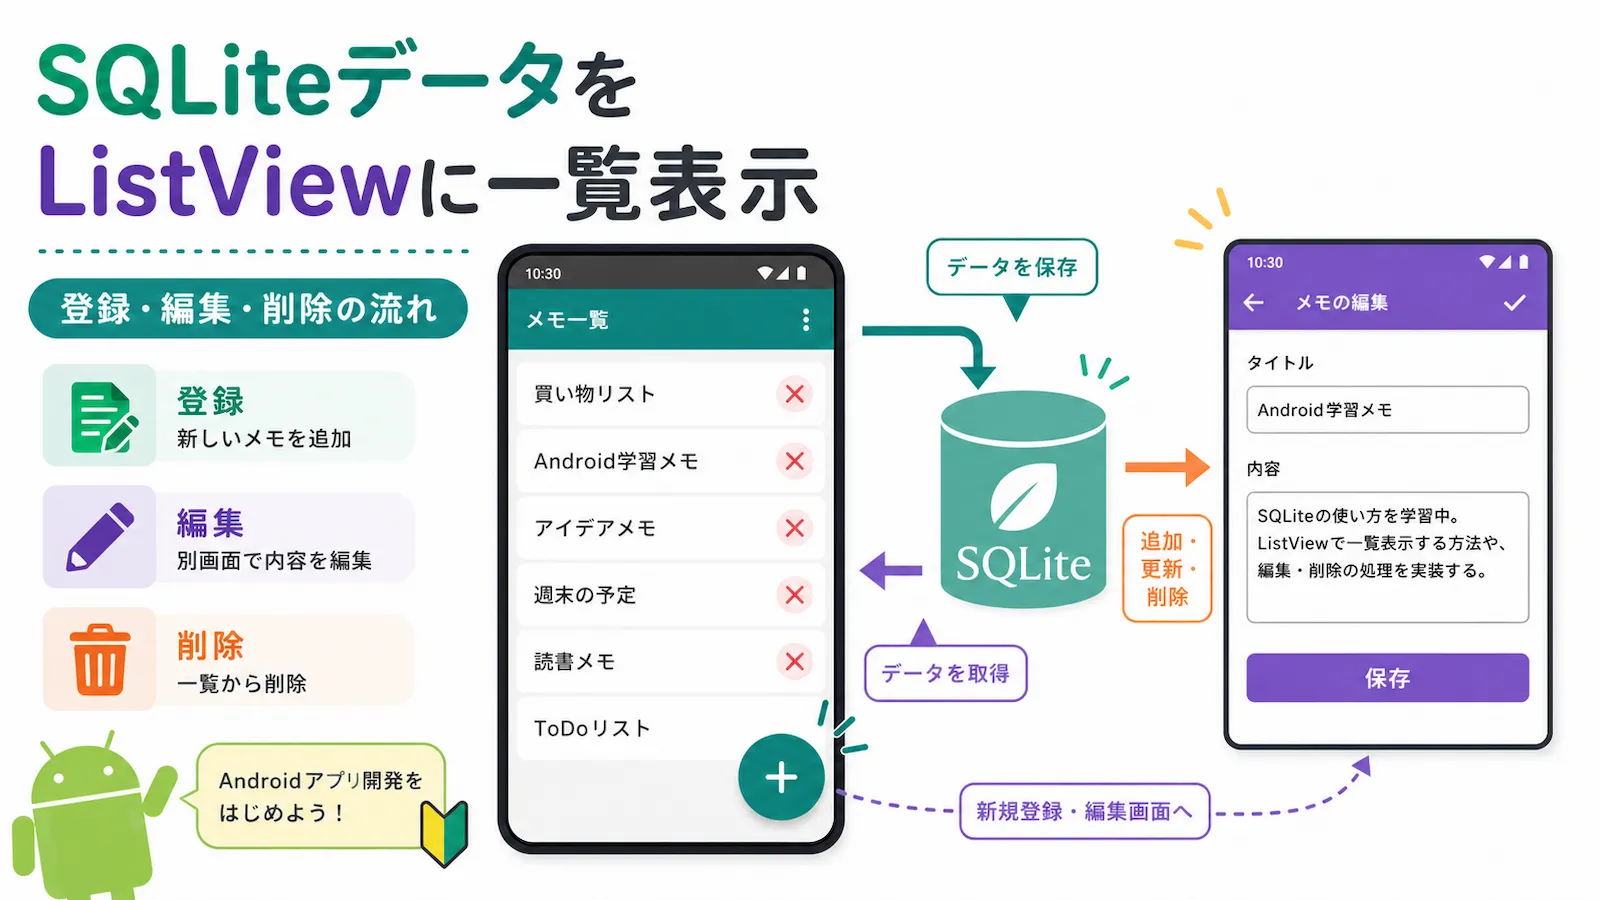
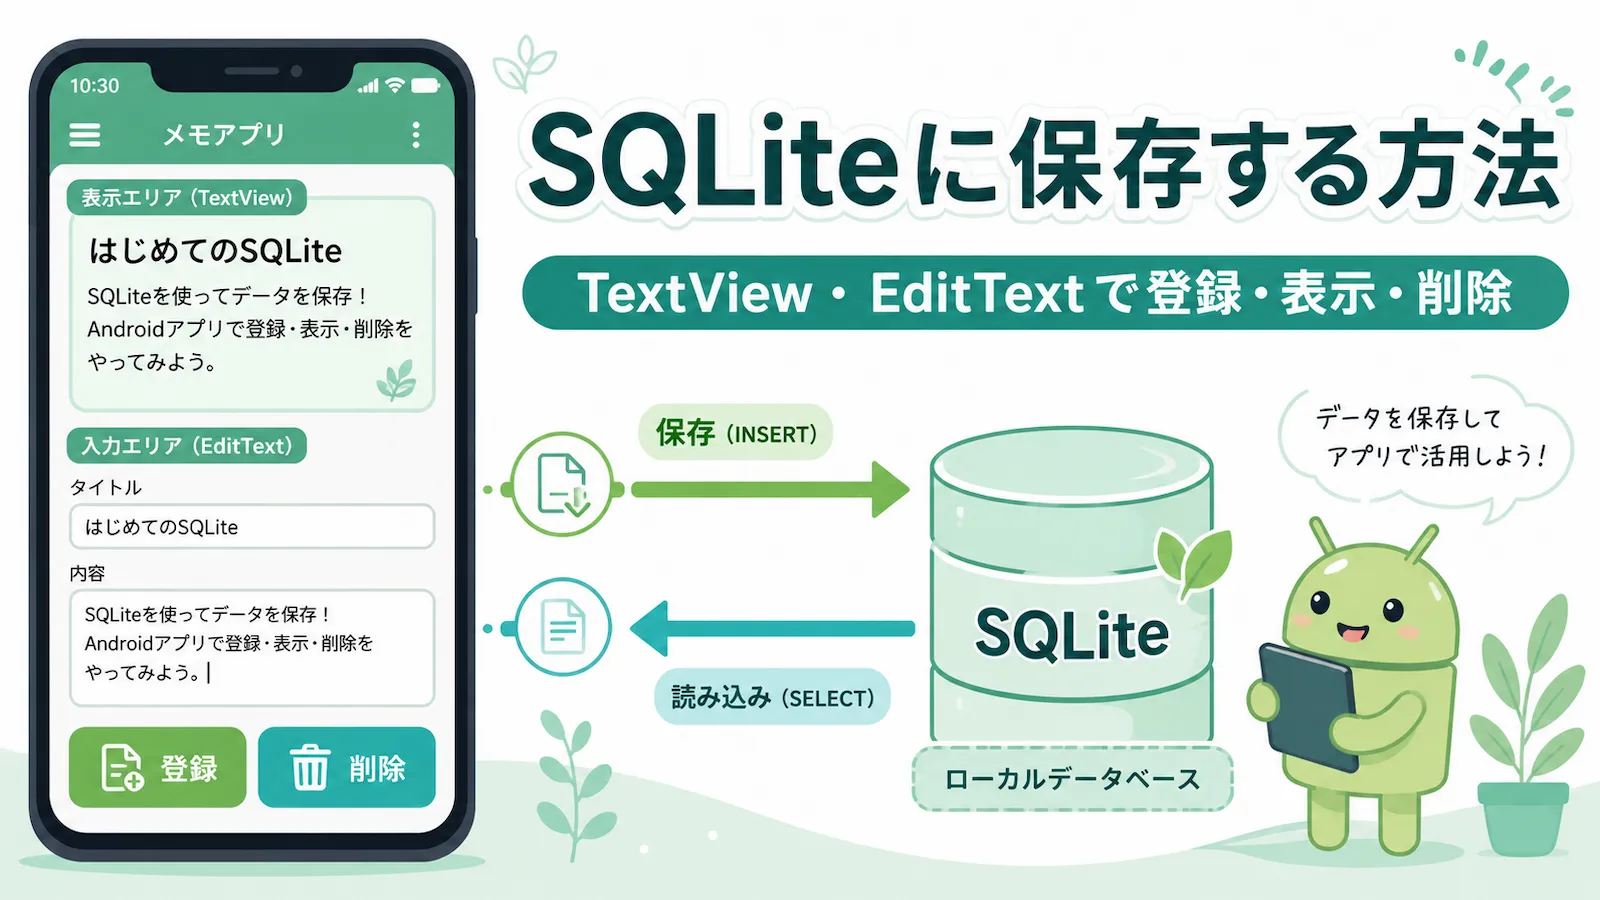
Android Studioで、SQLiteデータベースにデータを保存し、その結果を画面に表示して確認する方法を紹介します。
Googleは、SQLiteを直接扱う方法よりも、抽象化レイヤーの Room を使う方法を案内しています。
ただ、SQLiteそのものの動きや、データがどのように保存・表示されるのかを理解したいときは、まずシンプルな構成で試してみるのも分かりやすいです。
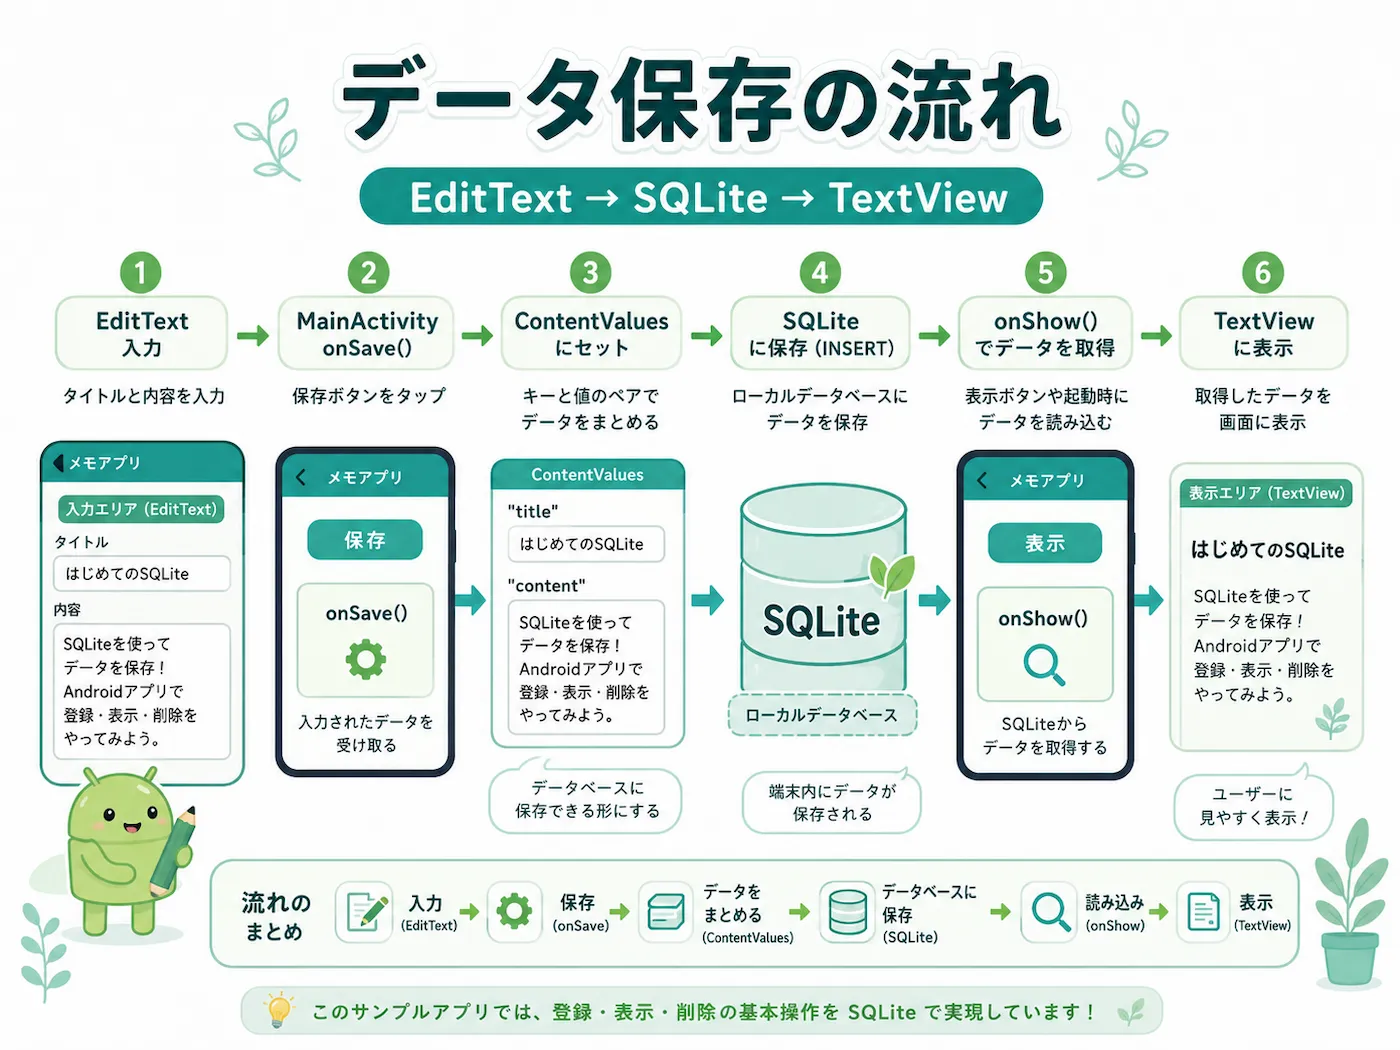
この記事では、TextView・EditText・Button を使った小さなメモアプリを例にして、次の流れを確認していきます。
- 入力欄にタイトルと内容を入力する
- 「登録」ボタンでSQLiteに保存する
- 保存した内容をTextViewに表示する
- もう一度登録すると更新される
- 「削除」ボタンでデータを消す
完成イメージを先に見ておくと、これから何を作るのかつかみやすくなります。
実際の動きは次のようになります。
動きの流れを図にすると、次のようなイメージです。
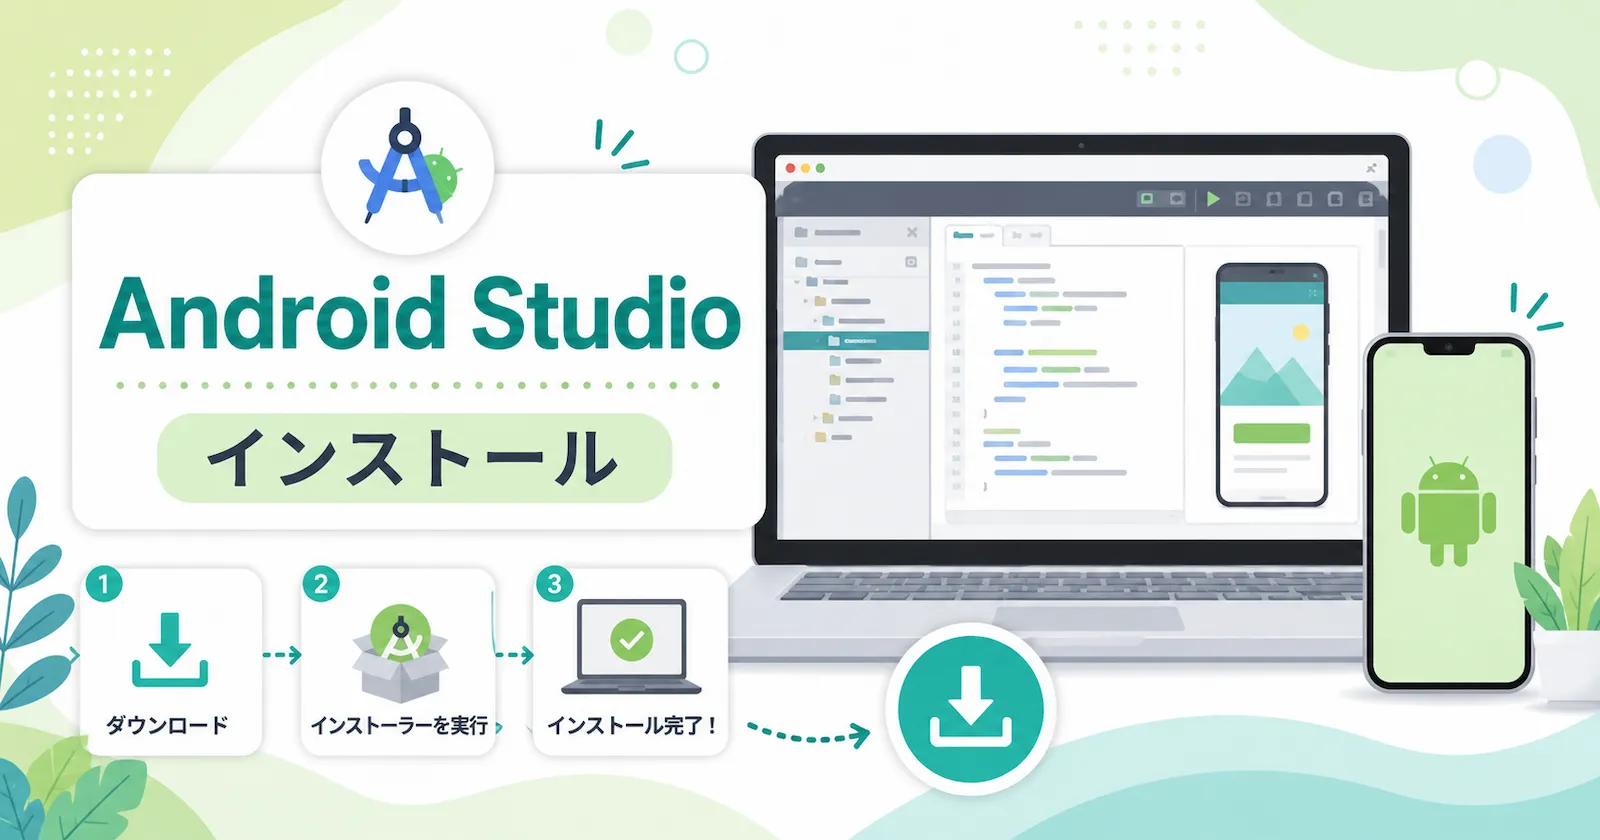
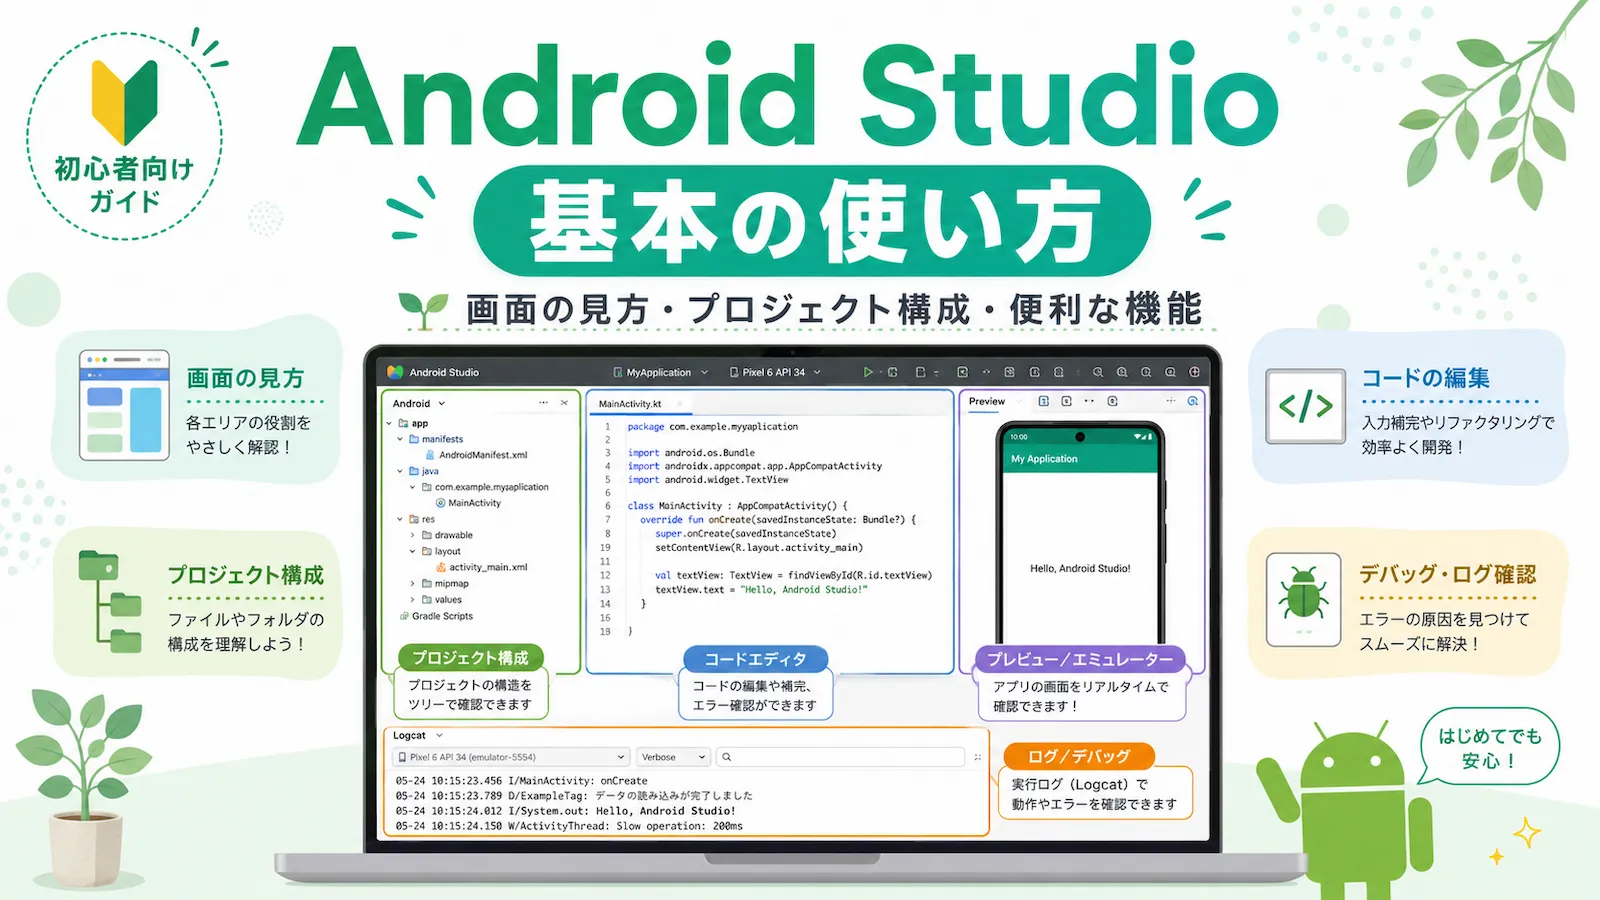
Android Studioのインストールや基本的な画面の見方は、先にこちらの記事を読んでおくと進めやすいです。
構成
このサンプルの主な構成は、次のようになっています。
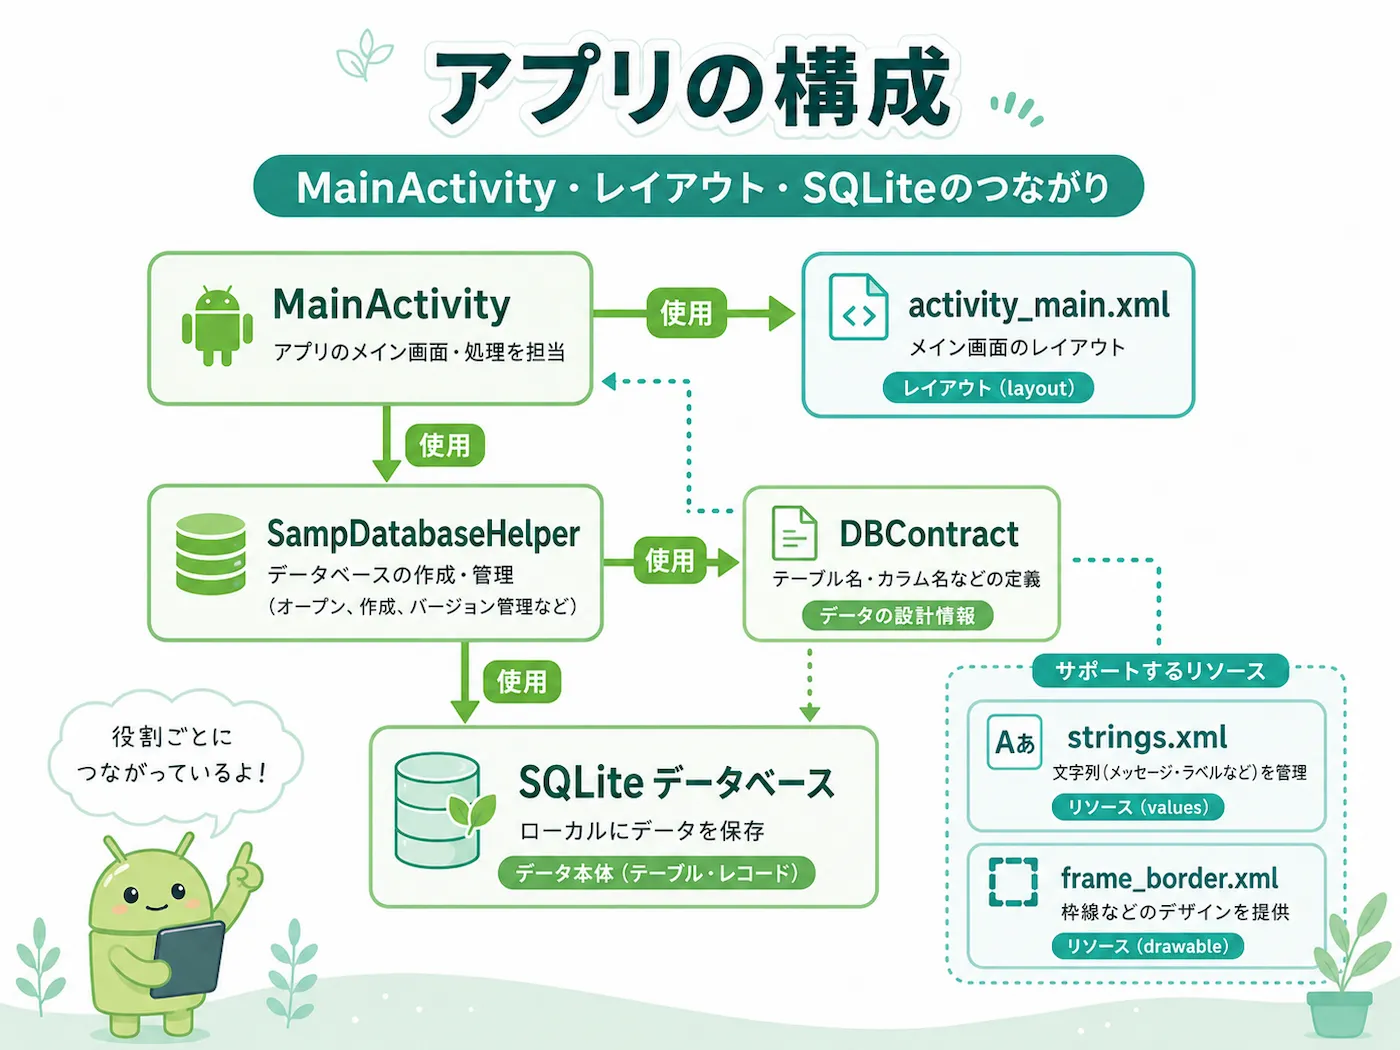
こちらの図でも、ファイルどうしの関係を確認できます。
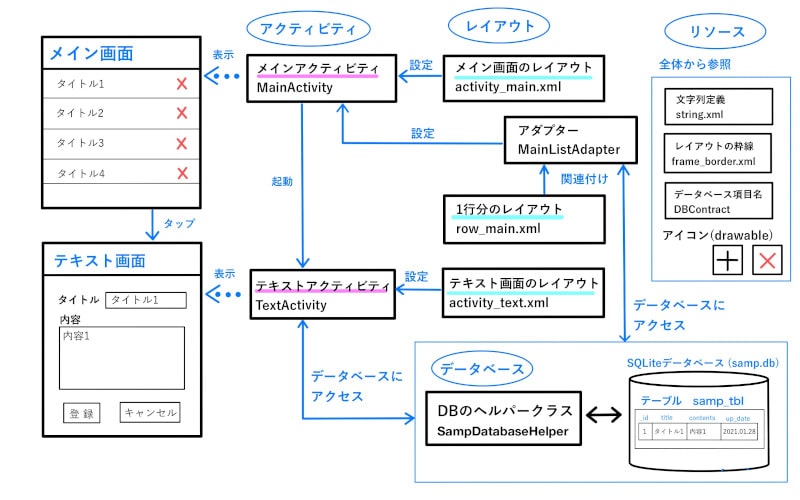
主な役割は次のとおりです。
- MainActivity:画面表示と処理の中心
- activity_main.xml:画面レイアウト
- DBContract:テーブル名やカラム名の定義
- SampDatabaseHelper:データベース作成と管理
- SQLite:実際のデータ保存先
- strings.xml / frame_border.xml:文字列や見た目の補助
順番に見ていきます。
プロジェクト作成
新しいプロジェクトは、前回の記事の「プロジェクト作成」の章と同じ流れで作成できます。
Android Studioをインストール|プロジェクト作成の章
今回のプロジェクト名は、SampTextView とします。
リソース準備
まずは、アプリ内で使う文字列や入力欄の見た目を整えるためのリソースを用意します。
strings.xml
app/res/values/strings.xml を開いて、次のように編集します。
<resources>
    <string name="app_name">SampTextView</string>
    <string name="db_title">データベース登録内容</string>
    <string name="reg_title">登録・編集</string>
    <string name="title">タイトル</string>
    <string name="input_title">タイトルを入力</string>
    <string name="contents">内容</string>
    <string name="input_contents">内容を入力</string>
    <string name="reg">登録</string>
    <string name="del">削除</string>
</resources>
ここで定義した name を、レイアウトやJavaコード側から参照します。
frame_border.xml
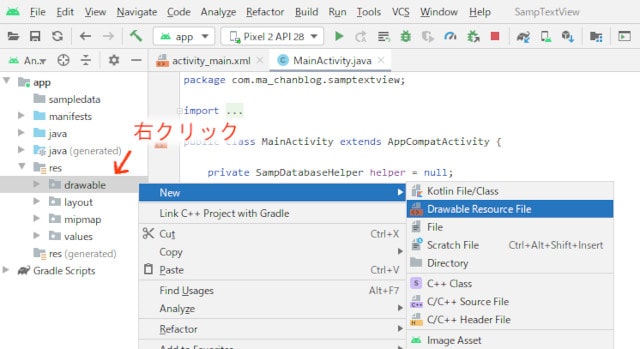
次に、入力欄に枠線を付けるためのDrawableリソースを追加します。
app/res/drawable を右クリックして、[New] → [Drawable Resource File] を選び、ファイル名を frame_border にします。
作成した frame_border.xml を、次のように編集します。
<?xml version="1.0" encoding="utf-8"?>
<shape xmlns:android="http://schemas.android.com/apk/res/android">
    <stroke  android:width="3px" android:color="#CCCCCC" />
    <padding android:left="2px"  android:top="2px"
             android:right="2px" android:bottom="2px" />
    <corners android:radius="2px" />
</shape>
この設定を使うと、EditTextの入力欄を見やすくできます。
DBContract
次に、テーブル名やカラム名をまとめる DBContract クラスを追加します。
Javaクラスを追加するときは、パッケージを右クリックして [New] → [Java Class] を選びます。
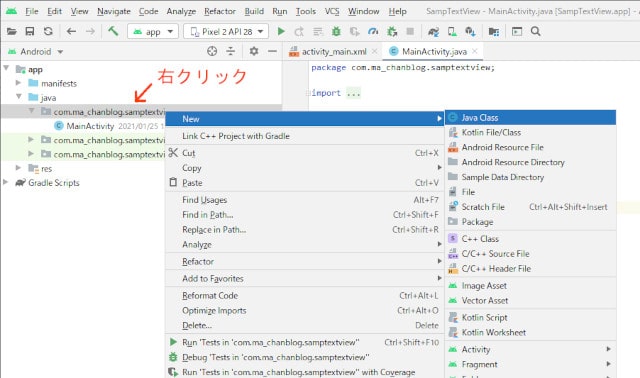
クラス名を DBContract にして、次の内容を入力します。
package com.example.samptextview;

import android.provider.BaseColumns;

// データベースのテーブル名・項目名を定義
public final class DBContract {

    // 誤ってインスタンス化しないようにコンストラクタをプライベート宣言
    private DBContract() {}

    // テーブルの内容を定義
    public static class DBEntry implements BaseColumns {
        // BaseColumns インターフェースを実装することで、内部クラスは_IDを継承できる
        public static final String TABLE_NAME           = "samp_tbl";
        public static final String COLUMN_NAME_TITLE    = "title";
        public static final String COLUMN_NAME_CONTENTS = "contents";
        public static final String COLUMN_NAME_UPDATE   = "up_date";
    }
}
BaseColumns を実装しているので、_ID という主キー用の定数を利用できます。
データベース作成|SQLiteOpenHelper
AndroidでSQLiteを使うときは、SQLiteOpenHelper を継承したクラスを作っておくと、データベースの作成や管理がしやすくなります。
全体像は、次の図のようなイメージです。
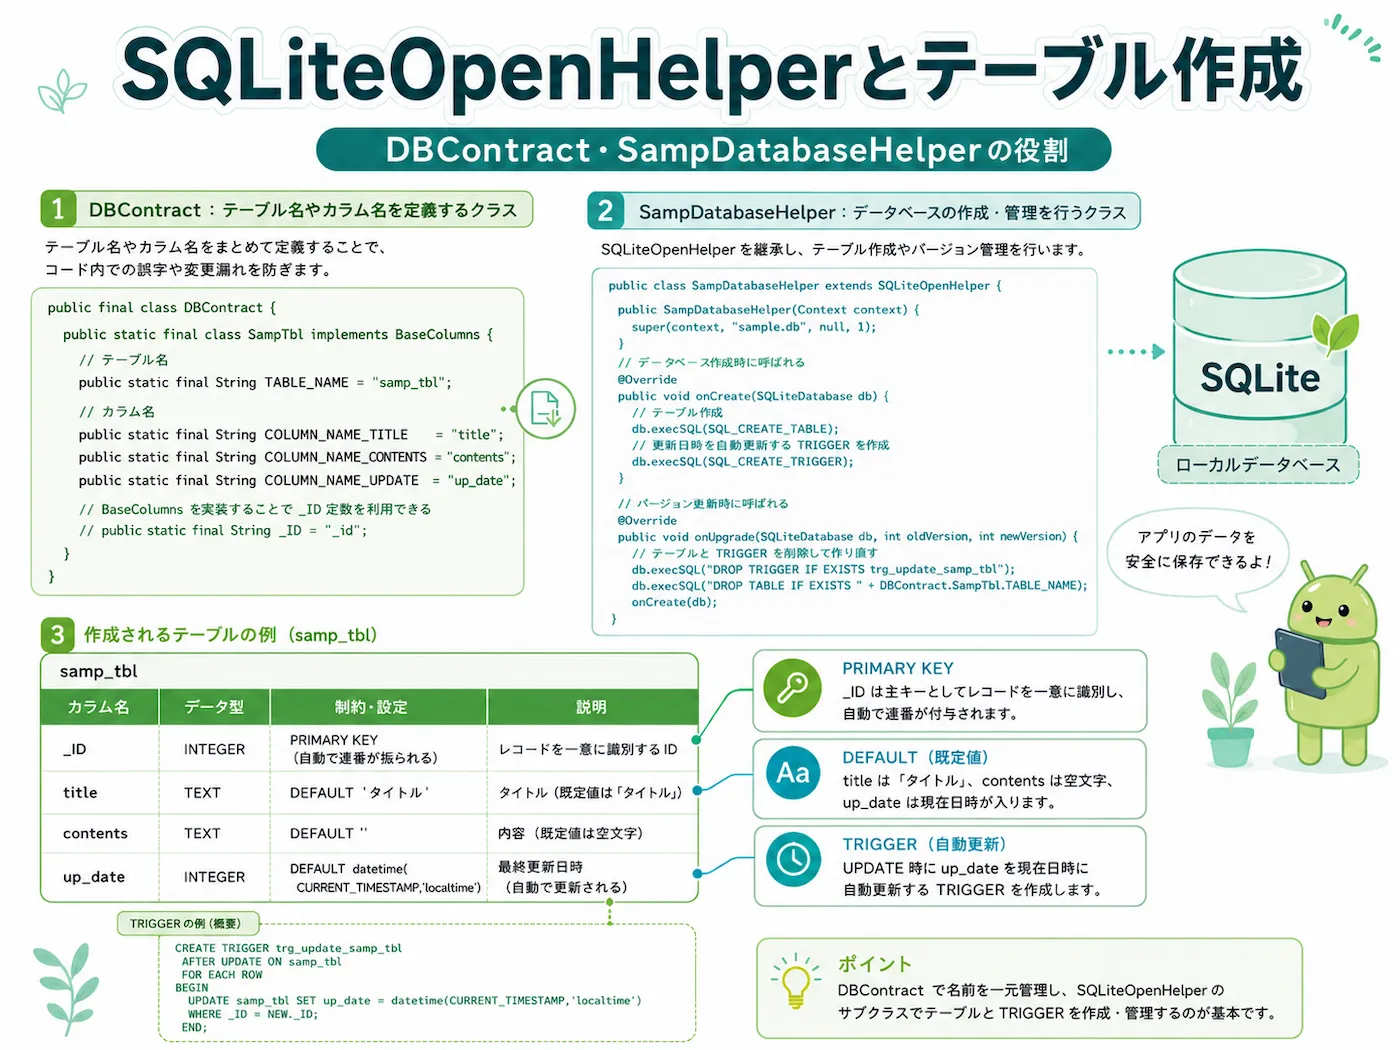
新しいJavaクラスを追加して、名前を SampDatabaseHelper とし、次の内容を入力します。
package com.example.samptextview;

import android.content.Context;
import android.database.sqlite.SQLiteDatabase;
import android.database.sqlite.SQLiteOpenHelper;
import static com.ma_chanblog.samptextview.DBContract.DBEntry;

// データベースをアプリから使用するために、 SQLiteOpenHelperを継承する
// SQLiteOpenHelperは、データベースやテーブルが存在する場合はそれを開き、存在しない場合は作成してくれる
public class SampDatabaseHelper extends SQLiteOpenHelper {

    // データベースのバージョン
    // テーブルの内容などを変更したら、この数字を変更する
    static final private int VERSION = 2;

    // データベース名
    static final private String DBNAME = "samp.db";

    // コンストラクタは必ず必要
    public SampDatabaseHelper(Context context) {
        super(context, DBNAME, null, VERSION);
    }

    // データベース作成時にテーブルを作成
    public void onCreate(SQLiteDatabase db) {

        // テーブルを作成
        db.execSQL(
            "CREATE TABLE "+ DBEntry.TABLE_NAME + " (" +
            DBEntry._ID + " INTEGER PRIMARY KEY, " +
            DBEntry.COLUMN_NAME_TITLE + " TEXT default 'タイトル', " +
            DBEntry.COLUMN_NAME_CONTENTS + " TEXT default '', " +
            DBEntry.COLUMN_NAME_UPDATE + " INTEGER DEFAULT (datetime(CURRENT_TIMESTAMP,'localtime'))) ");

        // トリガーを作成
        db.execSQL(
            "CREATE TRIGGER trigger_samp_tbl_update AFTER UPDATE ON " + DBEntry.TABLE_NAME +
            " BEGIN "+
            " UPDATE " + DBEntry.TABLE_NAME + " SET up_date = DATETIME('now', 'localtime') WHERE rowid == NEW.rowid; "+
            " END;");
    }

    // データベースをバージョンアップした時、テーブルを削除してから再作成
    public void onUpgrade(SQLiteDatabase db, int i, int i1) {

        db.execSQL("DROP TABLE IF EXISTS " + DBEntry.TABLE_NAME);
        onCreate(db);
    }
}
テーブル作成
onCreate() では、データベースが初めて作られるタイミングでテーブルも作成します。
execSQL() は、SQL文を実行するためのメソッドです。
CREATE TABLE でテーブルを作成し、CREATE TRIGGER で更新日時を自動更新する仕組みを追加しています。
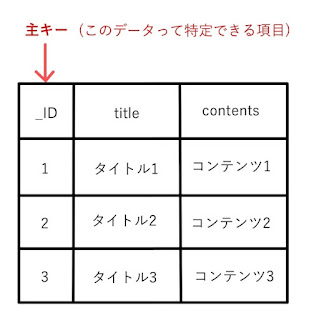
PRIMARY KEY
次の部分では、_ID というINTEGER型の項目を PRIMARY KEY にしています。
DBEntry._ID + " INTEGER PRIMARY KEY, "PRIMARY KEYは、その行を一意に識別するための項目です。
INTEGER型でPRIMARY KEYを指定すると、登録時に値を省略した場合でも、自動的に重ならない番号が割り振られます。
default
次のように書くと、値が指定されなかったときに既定値が入ります。
DBEntry.COLUMN_NAME_TITLE + " TEXT default 'タイトル', "
DBEntry.COLUMN_NAME_CONTENTS + " TEXT default '', "
DBEntry.COLUMN_NAME_UPDATE + " INTEGER DEFAULT (datetime(CURRENT_TIMESTAMP,'localtime'))) "titleは既定値として「タイトル」contentsは空文字up_dateは登録時点の日時
が入る設定です。
TRIGGER
CREATE TRIGGER ...の部分は、データが更新されたときに up_date を自動更新するための設定です。
更新日時を自動で入れておきたいときに便利です。
データベースアップグレード
onUpgrade() は、データベースのバージョン番号が変わったときに呼ばれます。
このサンプルでは、古いテーブルを削除してから作り直しています。
そのため、テーブル構成を変更したときは VERSION の値も合わせて見直します。
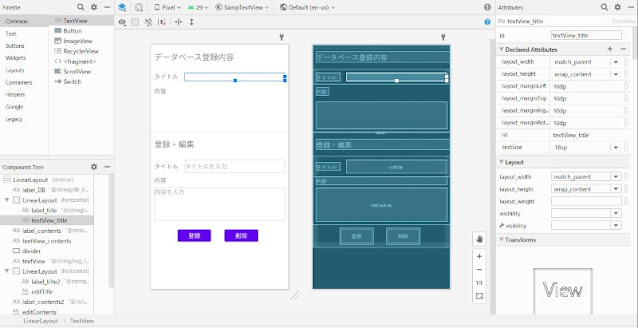
画面レイアウト
次に、画面レイアウトを設定します。
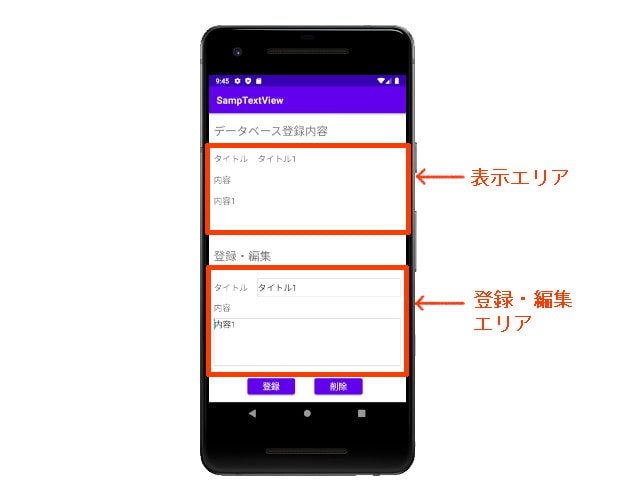
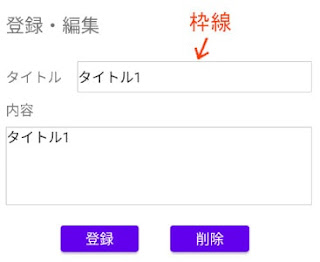
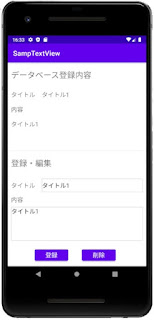
完成画面の中で、それぞれの部品がどこに当たるかを先に見ておくと分かりやすいです。
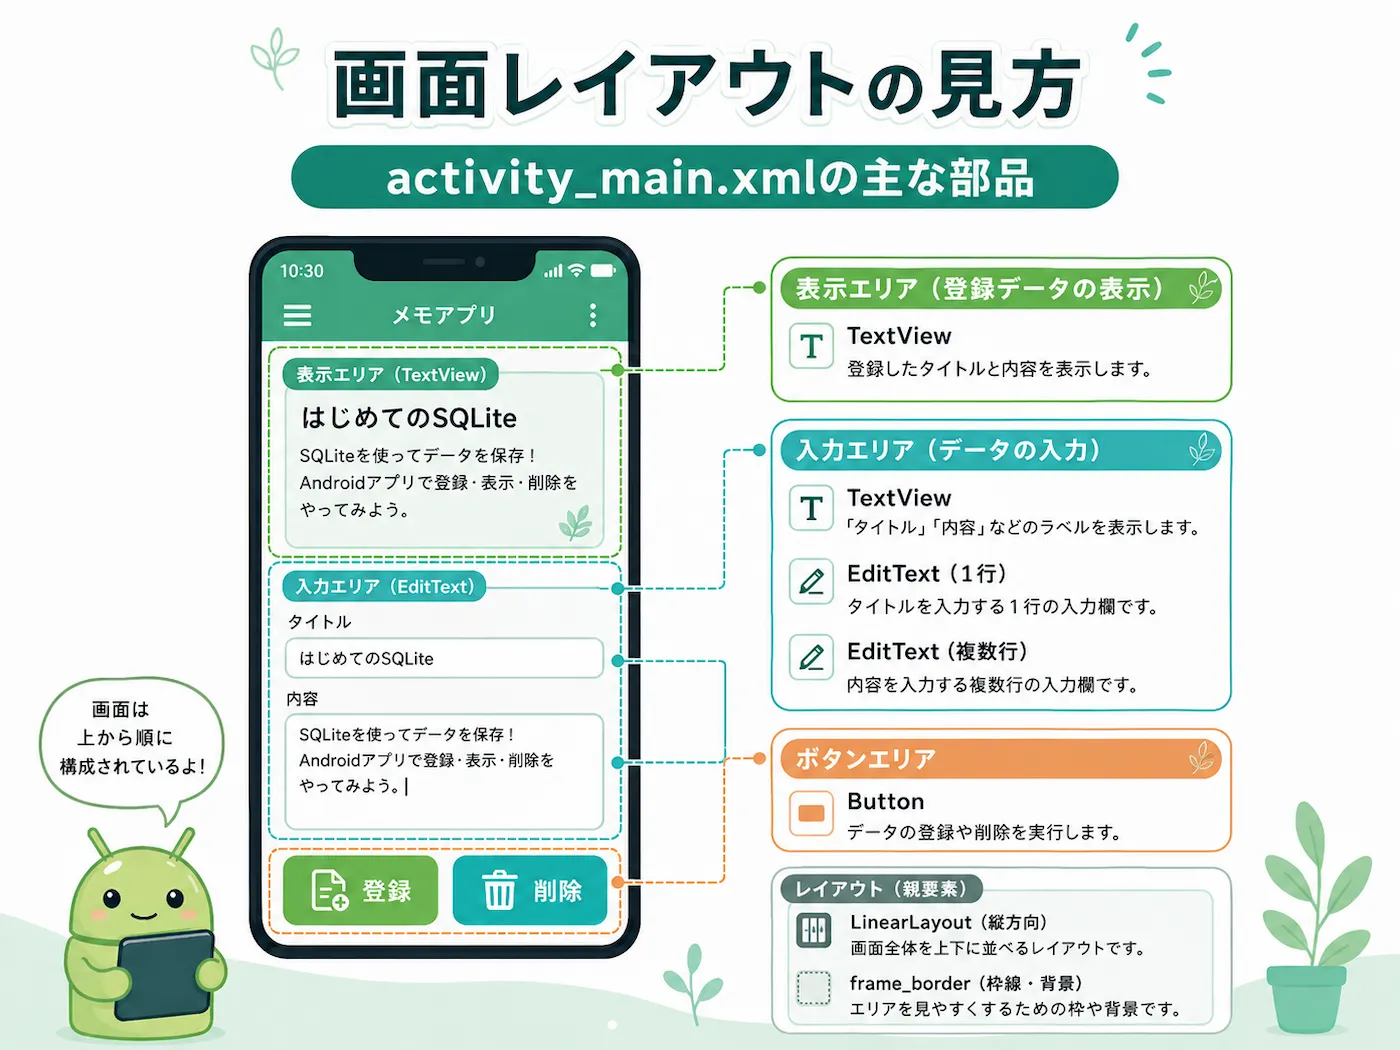
画面例はこちらです。
activity_main.xml
activity_main.xml を、次のように編集します。
activity_main.xml(クリックして表示)
<?xml version="1.0" encoding="utf-8"?>
<LinearLayout xmlns:android="http://schemas.android.com/apk/res/android"
    android:layout_width="match_parent"
    android:layout_height="wrap_content"
    android:orientation="vertical">

    <TextView
        android:id="@+id/label_DB"
        android:layout_width="match_parent"
        android:layout_height="wrap_content"
        android:layout_marginBottom="20dp"
        android:layout_marginStart="10dp"
        android:layout_marginTop="20dp"
        android:text="@string/db_title"
        android:textAlignment="textStart"
        android:textSize="24sp" />

    <LinearLayout
        android:layout_width="match_parent"
        android:layout_height="match_parent"
        android:orientation="horizontal">

        <TextView
            android:id="@+id/label_tilte"
            android:layout_width="wrap_content"
            android:layout_height="wrap_content"
            android:layout_marginBottom="10dp"
            android:layout_marginLeft="10dp"
            android:layout_marginRight="10dp"
            android:layout_marginTop="10dp"
            android:text="@string/title"
            android:textSize="18sp" />

        <TextView
            android:id="@+id/textView_title"
            android:layout_width="match_parent"
            android:layout_height="wrap_content"
            android:layout_marginBottom="10dp"
            android:layout_marginLeft="10dp"
            android:layout_marginRight="10dp"
            android:layout_marginTop="10dp"
            android:textSize="18sp" />
    </LinearLayout>

    <TextView
        android:id="@+id/label_contents"
        android:layout_width="wrap_content"
        android:layout_height="wrap_content"
        android:layout_marginBottom="10dp"
        android:layout_marginLeft="10dp"
        android:layout_marginRight="10dp"
        android:layout_marginTop="10dp"
        android:text="@string/contents"
        android:textSize="18sp" />

    <TextView
        android:id="@+id/textView_contents"
        android:layout_width="match_parent"
        android:layout_height="80dp"
        android:layout_marginBottom="10dp"
        android:layout_marginLeft="10dp"
        android:layout_marginRight="10dp"
        android:layout_marginTop="10dp"
        android:textSize="18sp" />

    <View
        android:id="@+id/divider"
        android:layout_width="match_parent"
        android:layout_height="1dp"
        android:background="?android:attr/listDivider" />

    <TextView
        android:id="@+id/textView"
        android:layout_width="match_parent"
        android:layout_height="wrap_content"
        android:layout_marginBottom="20dp"
        android:layout_marginStart="10dp"
        android:layout_marginTop="20dp"
        android:text="@string/reg_title"
        android:textSize="24sp" />

    <LinearLayout
        android:layout_width="match_parent"
        android:layout_height="match_parent"
        android:orientation="horizontal">

        <TextView
            android:id="@+id/label_tilte2"
            android:layout_width="0dp"
            android:layout_height="wrap_content"
            android:layout_marginBottom="10dp"
            android:layout_marginLeft="10dp"
            android:layout_marginRight="10dp"
            android:layout_marginTop="10dp"
            android:layout_weight="1"
            android:text="@string/title"
            android:textSize="18sp" />

        <EditText
            android:id="@+id/editTitle"
            android:layout_width="300dp"
            android:layout_height="40dp"
            android:layout_marginBottom="10dp"
            android:layout_marginLeft="10dp"
            android:layout_marginRight="10dp"
            android:layout_marginTop="10dp"
            android:background="@drawable/frame_border"
            android:hint="@string/input_title"
            android:importantForAutofill="no"
            android:inputType="text"
            android:singleLine="true" />
    </LinearLayout>

    <TextView
        android:id="@+id/label_contents2"
        android:layout_width="match_parent"
        android:layout_height="wrap_content"
        android:layout_marginBottom="10dp"
        android:layout_marginLeft="10dp"
        android:layout_marginRight="10dp"
        android:text="@string/contents"
        android:textSize="18sp" />

    <EditText
        android:id="@+id/editContents"
        android:layout_width="match_parent"
        android:layout_height="100dp"
        android:layout_marginBottom="10dp"
        android:layout_marginLeft="10dp"
        android:layout_marginRight="10dp"
        android:background="@drawable/frame_border"
        android:gravity="top"
        android:hint="@string/input_contents"
        android:importantForAutofill="no"
        android:inputType="textMultiLine|text"
        android:singleLine="true" />

    <LinearLayout
        style="?android:attr/buttonBarStyle"
        android:layout_width="match_parent"
        android:layout_height="match_parent"
        android:orientation="horizontal">

        <Button
            android:id="@+id/btn_reg"
            style="?android:attr/buttonBarStyle"
            android:layout_width="100dp"
            android:layout_height="wrap_content"
            android:layout_gravity="center"
            android:layout_marginBottom="10dp"
            android:layout_marginEnd="10dp"
            android:layout_marginStart="80dp"
            android:layout_marginTop="10dp"
            android:onClick="onSave"
            android:text="@string/reg"
            android:textSize="18sp" />

        <Button
            android:id="@+id/btn_del"
            style="?android:attr/buttonBarStyle"
            android:layout_width="0dp"
            android:layout_height="wrap_content"
            android:layout_gravity="center"
            android:layout_marginBottom="10dp"
            android:layout_marginEnd="90dp"
            android:layout_marginStart="30dp"
            android:layout_marginTop="10dp"
            android:layout_weight="1"
            android:onClick="onDelete"
            android:text="@string/del"
            android:textSize="18sp" />

    </LinearLayout>

</LinearLayout>このレイアウトでは、LinearLayout を使って部品を縦方向・横方向に並べています。
また、editTitle と editContents の背景に frame_border を指定することで、入力欄の枠線を表示しています。
下のボタンでは、android:onClick を使ってメソッドをひも付けています。
- 登録ボタン →
onSave() - 削除ボタン →
onDelete()
レイアウトエディタも合わせて使うと、画面のイメージを確認しながら調整しやすくなります。設定できるオブジェクトやパラメータを見ながら進めたいときにも便利です。
アクティビティ(MainActivity)
次に、画面表示とデータ操作をまとめる MainActivity を作成します。
MainActivity (クリックして表示)
package com.example.samptextview;
import androidx.appcompat.app.AppCompatActivity;
import android.content.ContentValues;
import android.database.Cursor;
import android.database.sqlite.SQLiteDatabase;
import android.os.Bundle;
import android.view.View;
import android.widget.EditText;
import android.widget.TextView;
import static com.ma_chanblog.samptextview.DBContract.DBEntry;
public class MainActivity extends AppCompatActivity {
private SampDatabaseHelper helper = null;
private TextView viewTitle = null;
private TextView viewContents = null;
private EditText editTitle = null;
private EditText editContents = null;
@Override
protected void onCreate(Bundle savedInstanceState) {
super.onCreate(savedInstanceState);
setContentView(R.layout.activity_main);
// ビューオブジェクトを取得
viewTitle = findViewById(R.id.textView_title);
viewContents = findViewById(R.id.textView_contents);
editTitle = findViewById(R.id.editTitle);
editContents = findViewById(R.id.editContents);
// ヘルパーを準備
helper = new SampDatabaseHelper(this);
// データを表示
onShow();
}
// データを表示する
protected void onShow() {
// データベースから取得する項目を設定
String[] cols = {DBEntry.COLUMN_NAME_TITLE, DBEntry.COLUMN_NAME_CONTENTS};
// 読み込みモードでデータベースをオープン
try (SQLiteDatabase db = helper.getReadableDatabase()) {
// データを取得するSQLを実行
// 取得したデータがCursorオブジェクトに格納される
Cursor cursor = db.query(DBEntry.TABLE_NAME, cols, null,
null, null, null, null, null);
// moveToFirstで、カーソルを検索結果セットの先頭行に移動
// 検索結果が0件の場合、falseが返る
if (cursor.moveToFirst()){
// 表示用のテキスト・コンテンツに検索結果を設定
viewTitle.setText(cursor.getString(0));
viewContents.setText(cursor.getString(1));
// 入力用のテキスト・コンテンツにも検索結果を設定
editTitle.setText(cursor.getString(0));
editContents.setText(cursor.getString(1));
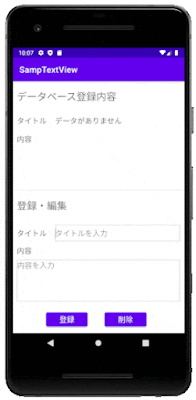
} else {
// 検索結果が0件の場合のメッセージを設定
viewTitle.setText("データがありません");
viewContents.setText("");
editTitle.setText("");
editContents.setText("");
}
}
}
// 保存処理
public void onSave(View view) {
// 入力欄に入力されたタイトルとコンテンツを取得
String title = editTitle.getText().toString();
String contents = editContents.getText().toString();
// 書き込みモードでデータベースをオープン
try (SQLiteDatabase db = helper.getWritableDatabase()) {
// 入力されたタイトルとコンテンツをContentValuesに設定
// ContentValuesは、項目名と値をセットで保存できるオブジェクト
ContentValues cv = new ContentValues();
cv.put(DBEntry.COLUMN_NAME_TITLE, title);
cv.put(DBEntry.COLUMN_NAME_CONTENTS, contents);
// 現在テーブルに登録されているデータの_IDを取得
Cursor cursor = db.query(DBEntry.TABLE_NAME, new String[] {DBEntry._ID}, null, null,
null, null, null, null);
// テーブルにデータが登録されていれば更新処理
if (cursor.moveToFirst()){
// 取得した_IDをparamsに設定
String[] params = {cursor.getString(0)};
// _IDのデータを更新
db.update(DBEntry.TABLE_NAME, cv, DBEntry._ID + " = ?", params);
} else {
// データがなければ新規登録
db.insert(DBEntry.TABLE_NAME, null, cv);
}
}
// データを表示
onShow();
}
// 削除処理
public void onDelete(View view){
try (SQLiteDatabase db = helper.getWritableDatabase()) {
db.delete(DBEntry.TABLE_NAME, null, null);
}
// データを表示
onShow();
}
}MainActivityの主な処理
onCreate()
onCreate() は、アクティビティが最初に作成されたときに呼ばれるメソッドです。
ここでは、次の準備をしています。
setContentView()でレイアウトを読み込むfindViewById()で画面部品を取得するSampDatabaseHelperを準備するonShow()を呼んで保存済みデータを表示する
onShow()
onShow() は、データベースからデータを読み込んで画面に表示する処理です。
getReadableDatabase()で読み込み用のデータベースを開くquery()でタイトルと内容を取得する- データがあればTextViewとEditTextにセットする
- データがなければ「データがありません」と表示する
onSave()
onSave() は、登録ボタンが押されたときの処理です。
最後に onShow() で表示を更新する
EditTextからタイトルと内容を取得する
ContentValues にデータを詰める
すでにデータがあるか確認する
データがあれば update()
なければ insert()
onDelete()
onDelete() は、削除ボタンが押されたときの処理です。
delete()でテーブル内のデータを削除するonShow()を呼んで画面表示も更新する
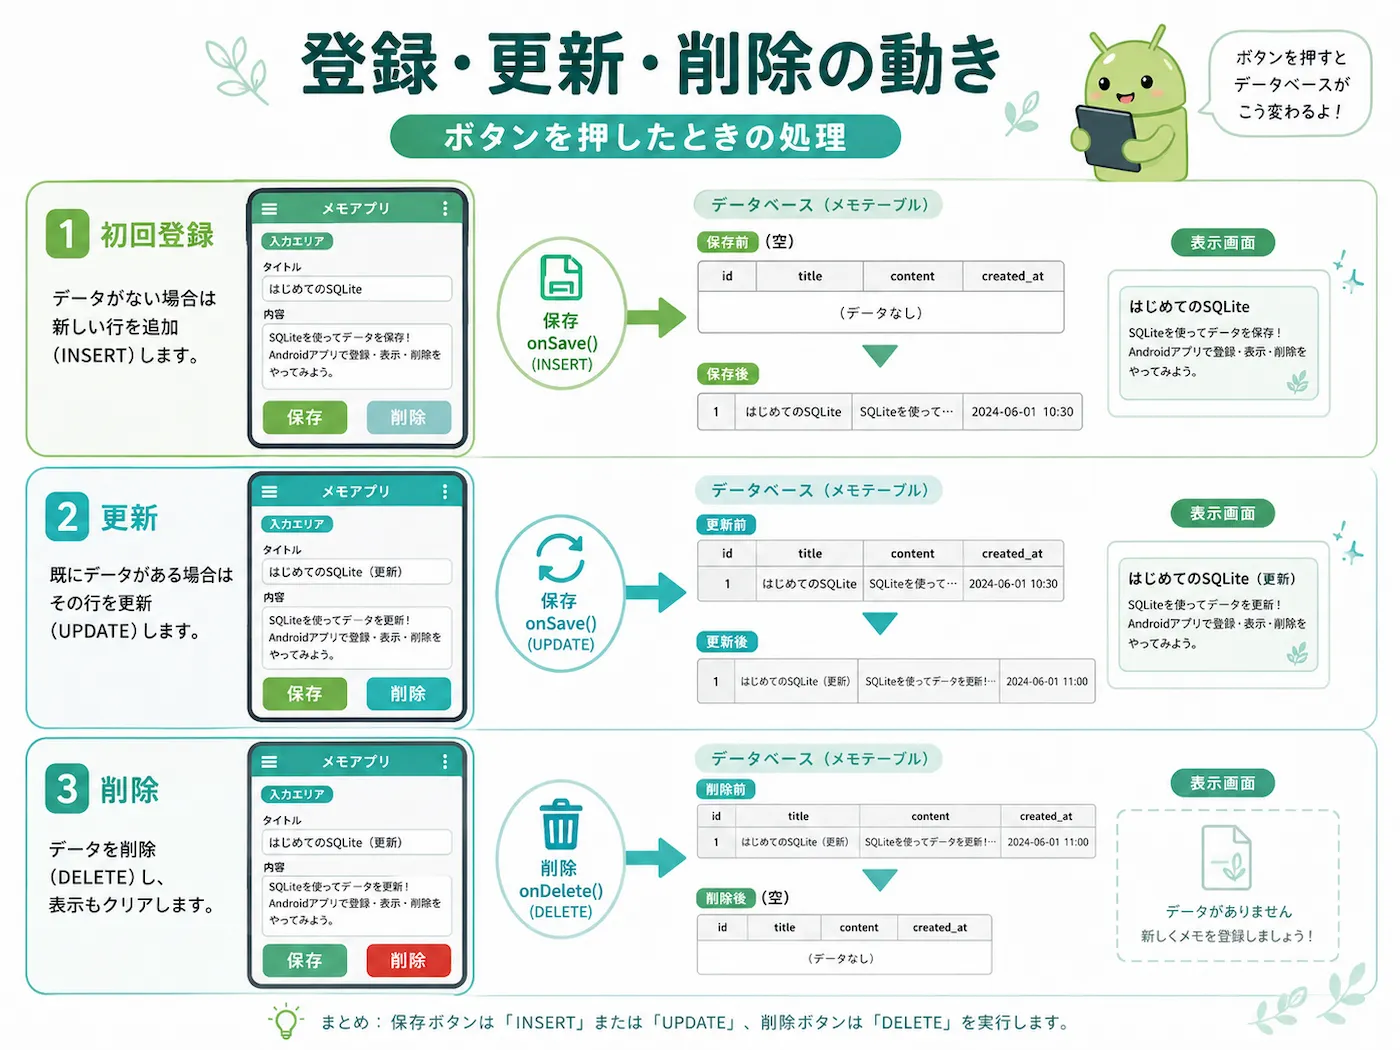
登録・更新・削除の動きは、図にすると次のようになります。
確認しておきたいところ
データベースの変更が反映されない
テーブル構成を変えたのに反映されないときは、VERSION の値を見直します。
SQLiteOpenHelperは、バージョン番号が変わったときに onUpgrade() を呼ぶ仕組みなので、ここが同じままだと古い構成のまま動くことがあります。
データが表示されない
onShow() が呼ばれているか、findViewById() で取得しているIDがレイアウト側と合っているかを確認します。
入力欄の見た目が崩れる
frame_border.xml の指定漏れや、activity_main.xml 側の android:background="@drawable/frame_border" の指定漏れがないかを見ます。
まとめ
今回は、TextView・EditText・Button・SQLite を使ったシンプルなメモアプリを作りながら、SQLiteの基本的な使い方を確認しました。
流れとしては、次のように考えると分かりやすいです。
- EditTextに入力する
- MainActivityで値を受け取る
- ContentValuesにまとめる
- SQLiteに保存する
- データを読み出す
- TextViewに表示する
Roomのような新しい仕組みを使う前に、SQLiteの基本動作を見ておきたいときにも使いやすい内容です。
こちらは、関連記事です。