※この記事は公開から時間が経っているため、現在の環境とは内容が異なる場合があります。
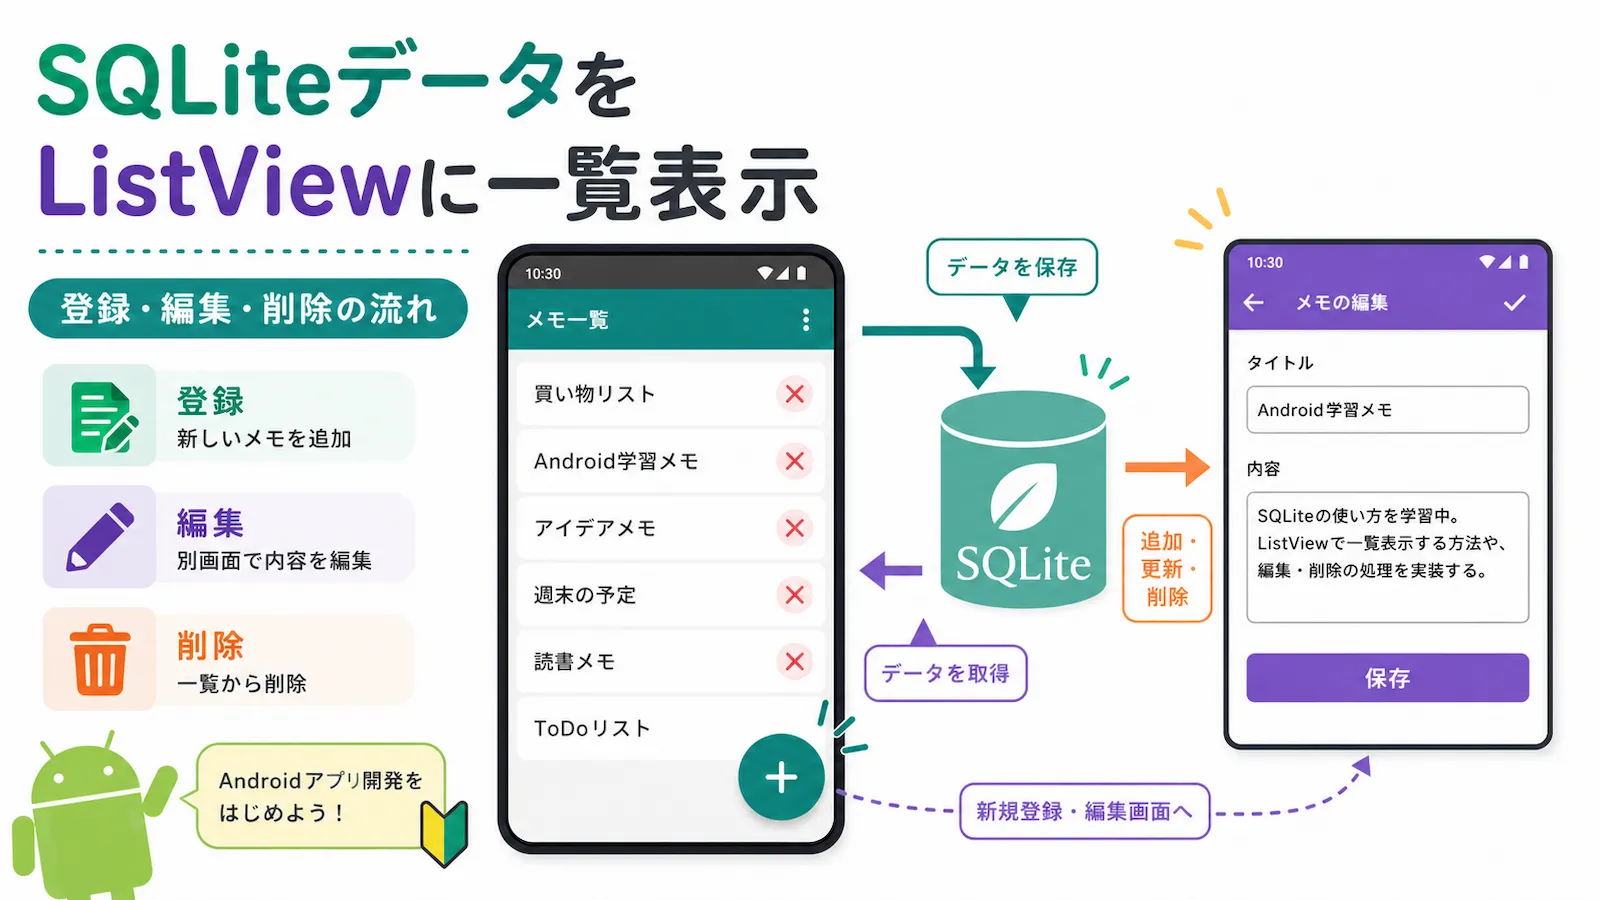
Android Studioで、SQLiteデータベースに保存したデータを ListViewに一覧表示 し、そのデータを 登録・編集・削除 する方法を紹介します。
今回作成するのは、SQLiteデータベースの内容を一覧表示するメイン画面と、データを登録・編集する画面を使ったシンプルなアプリです。
一覧画面では、次の操作ができます。
- 右下の +ボタン から新規登録画面を開く
- 一覧の行をタップして編集画面を開く
- 一覧右側の ×(削除)ボタン からデータを削除する
実際の動きは、次のようなイメージです。
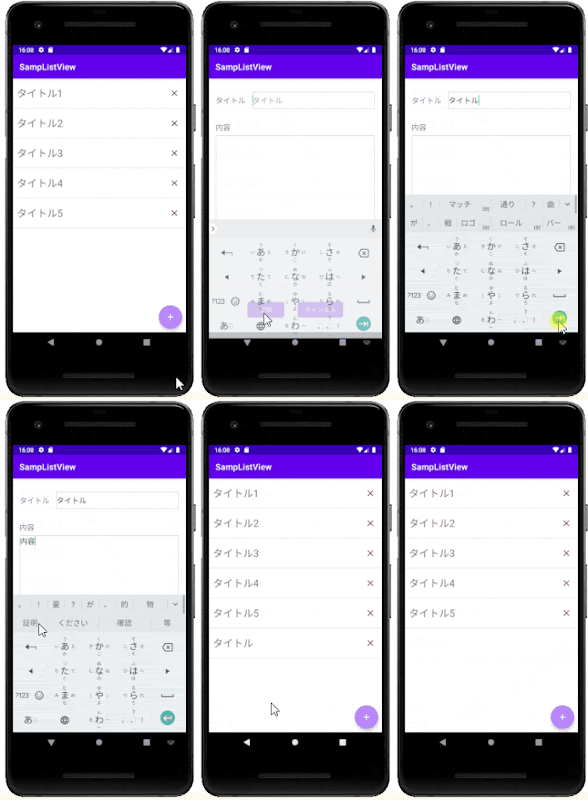
このアプリを題材に、データベースの情報をListViewに表示する方法と、ListViewの各行に配置した削除ボタンからデータを削除する方法を見ていきます。
この記事で作るもの
今回作成する画面は、大きく分けて2つです。
- 一覧画面:SQLiteデータベースの内容をListViewに表示する画面
- 登録・編集画面:データの新規登録や編集を行う画面
一覧画面の行をタップすると、登録・編集画面が開きます。
右下の+ボタンをタップした場合は、新規登録用の画面として開きます。
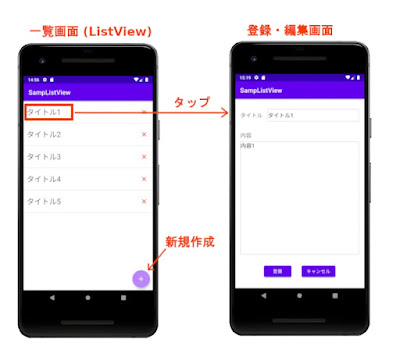
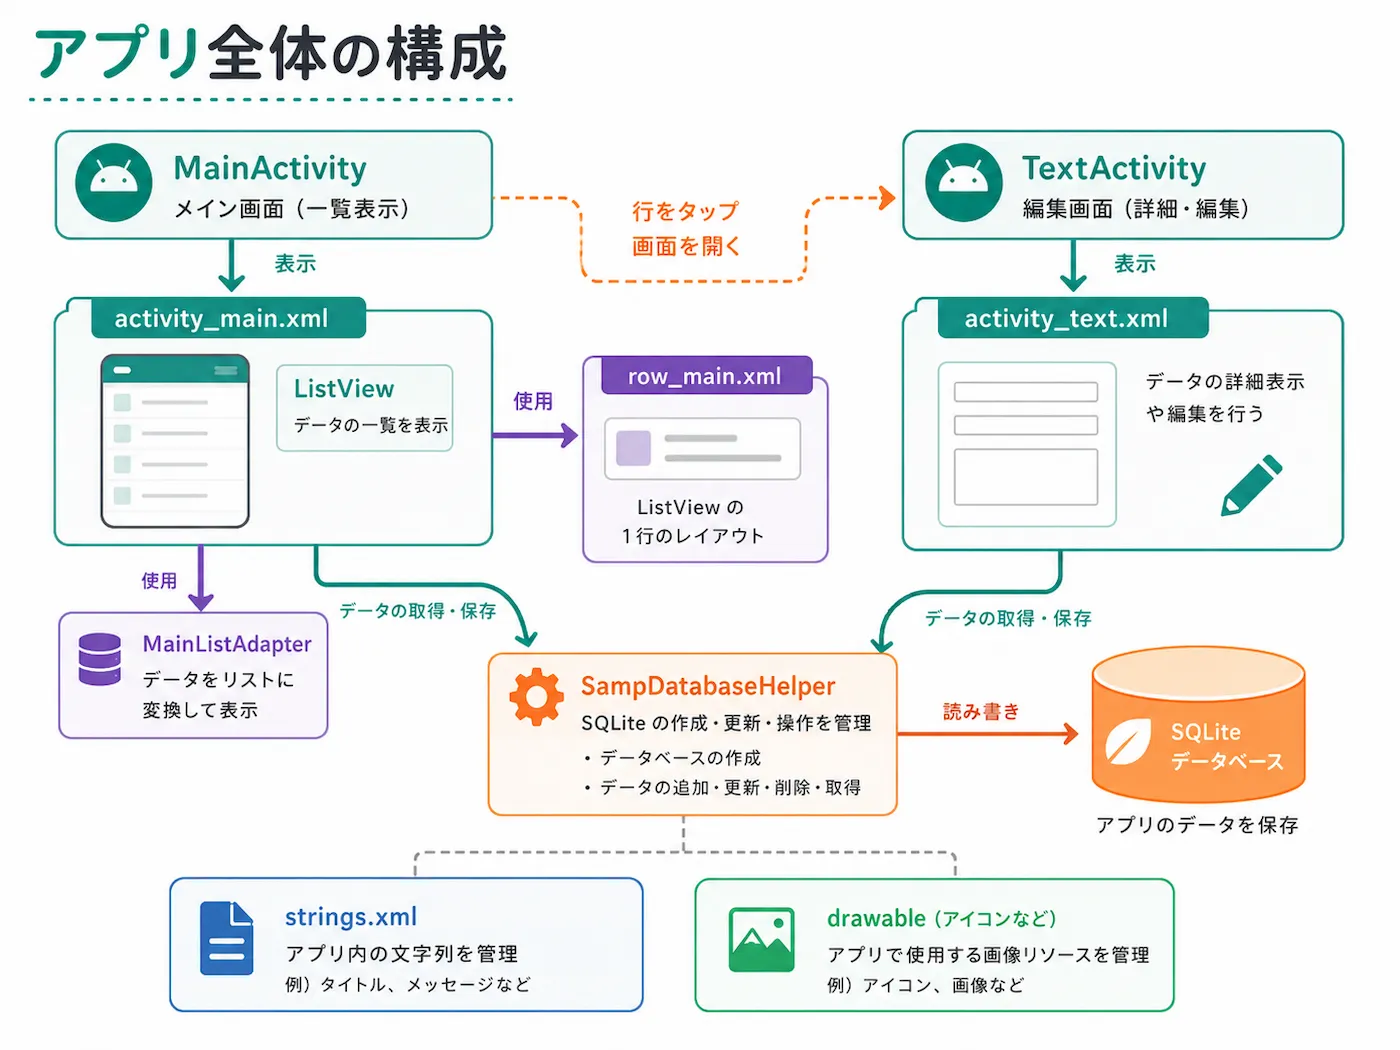
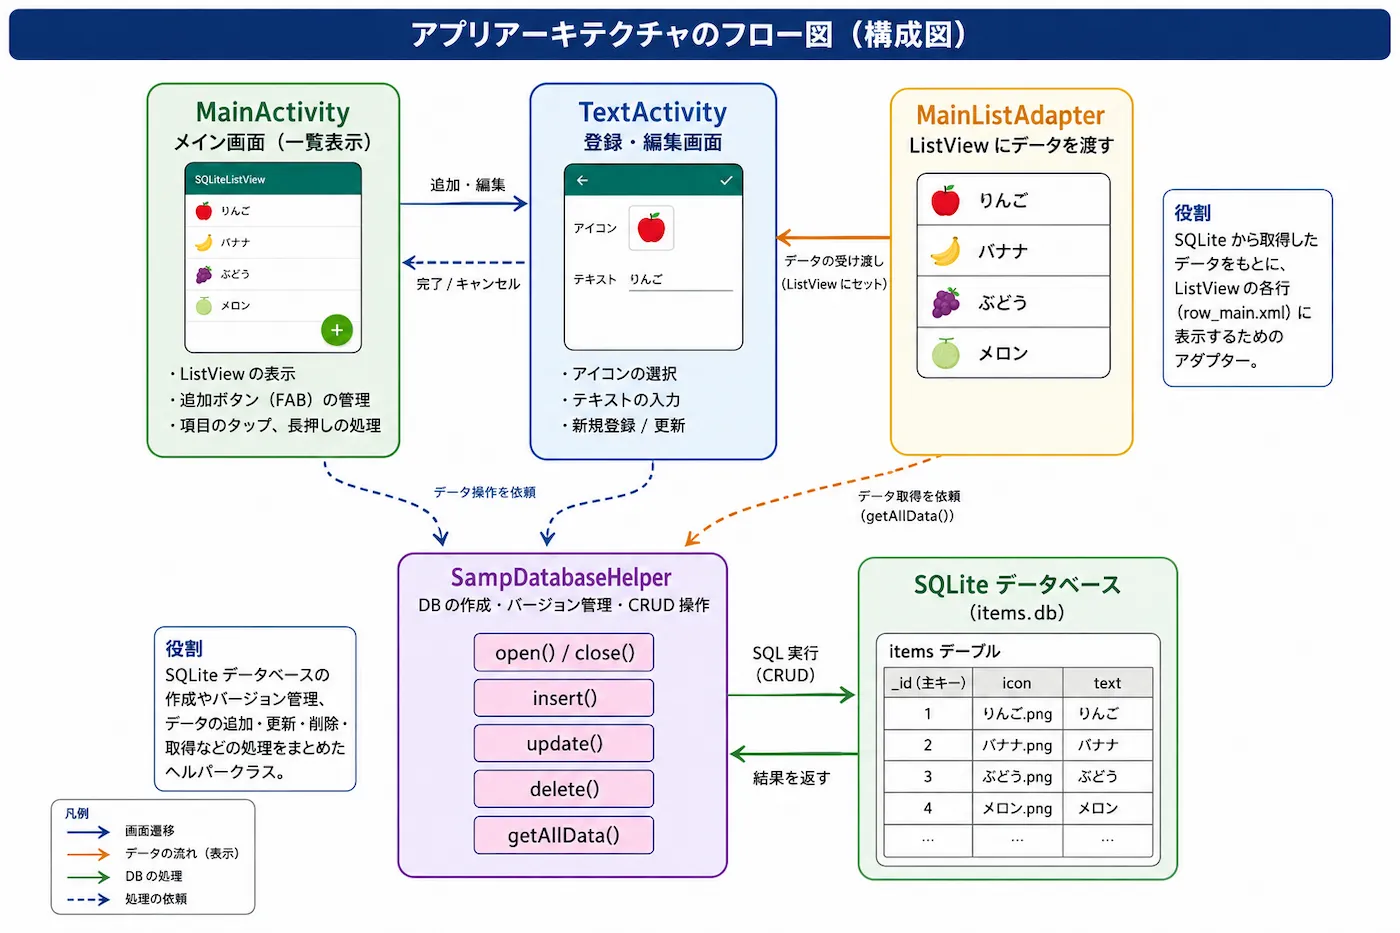
処理全体の流れを図にすると、次のようになります。
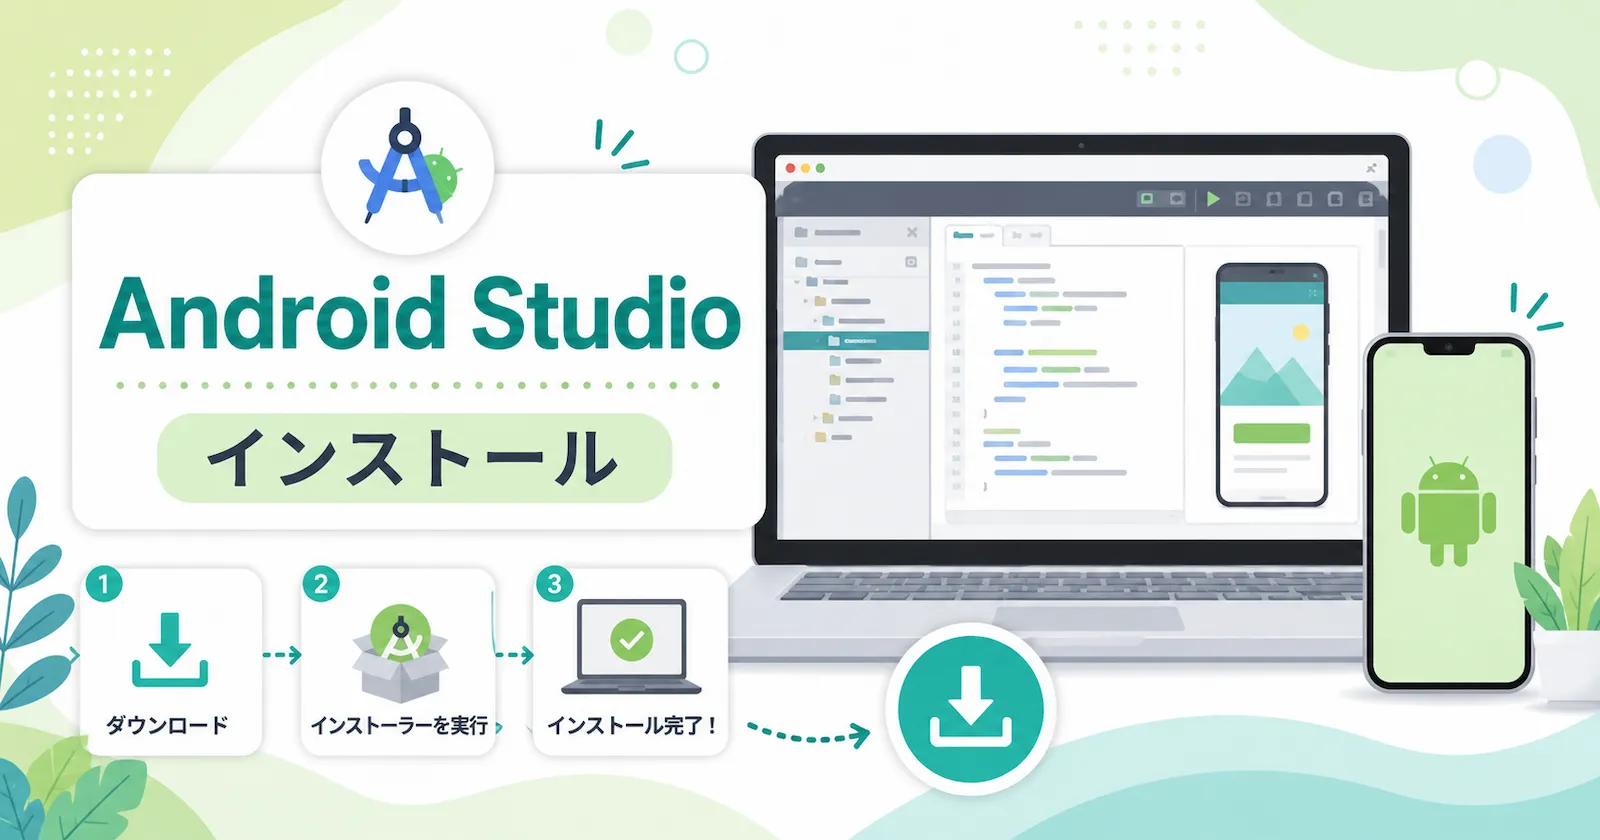
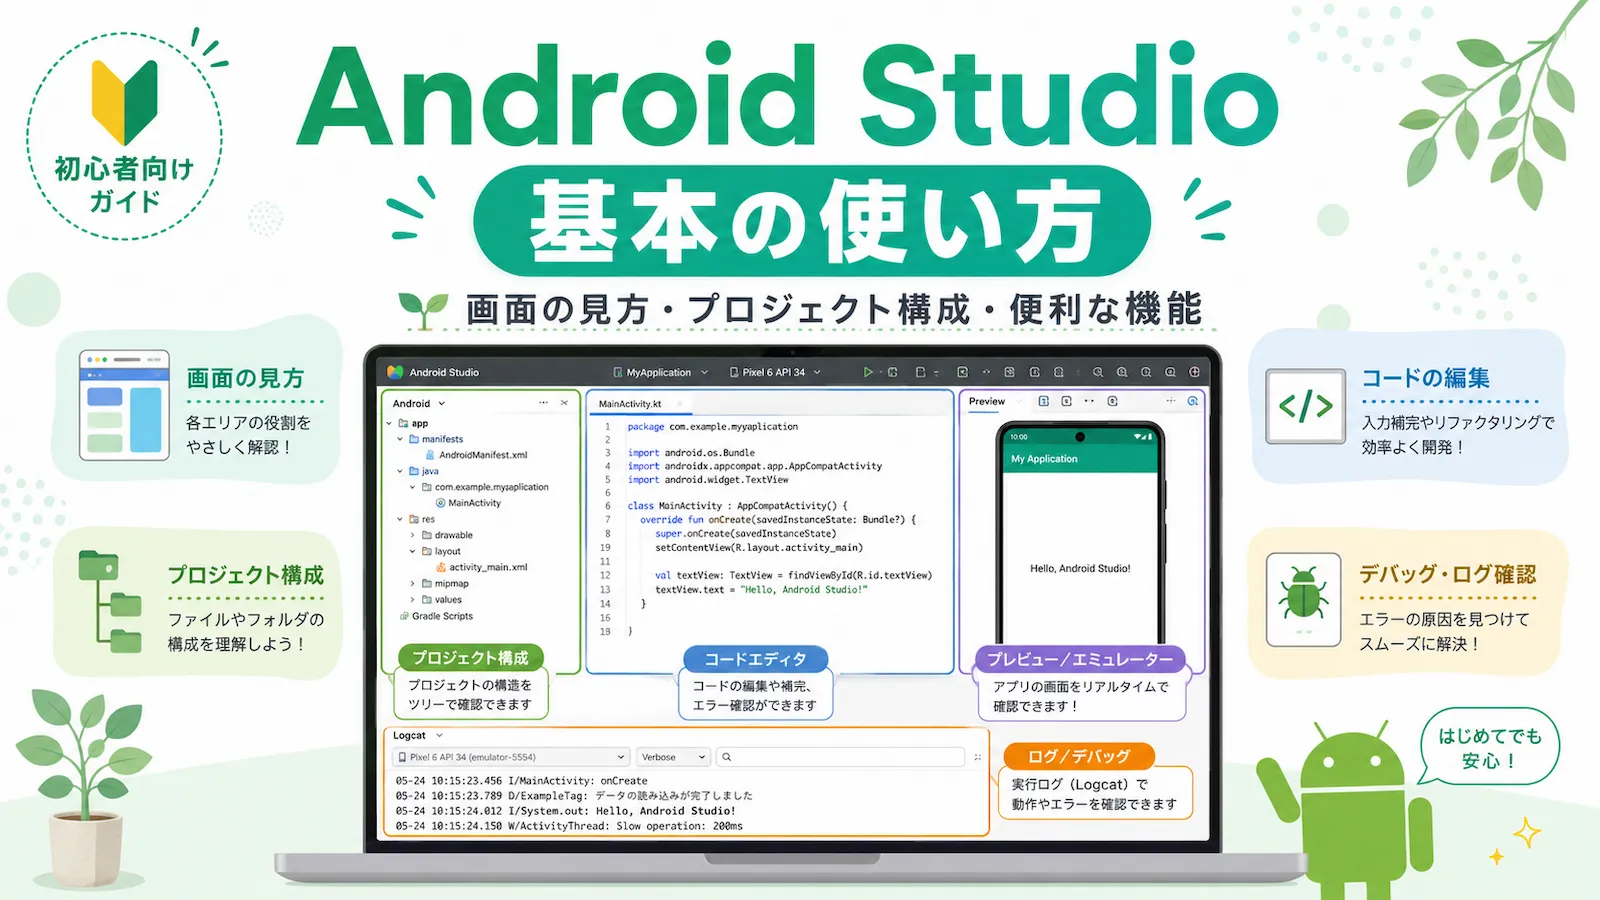
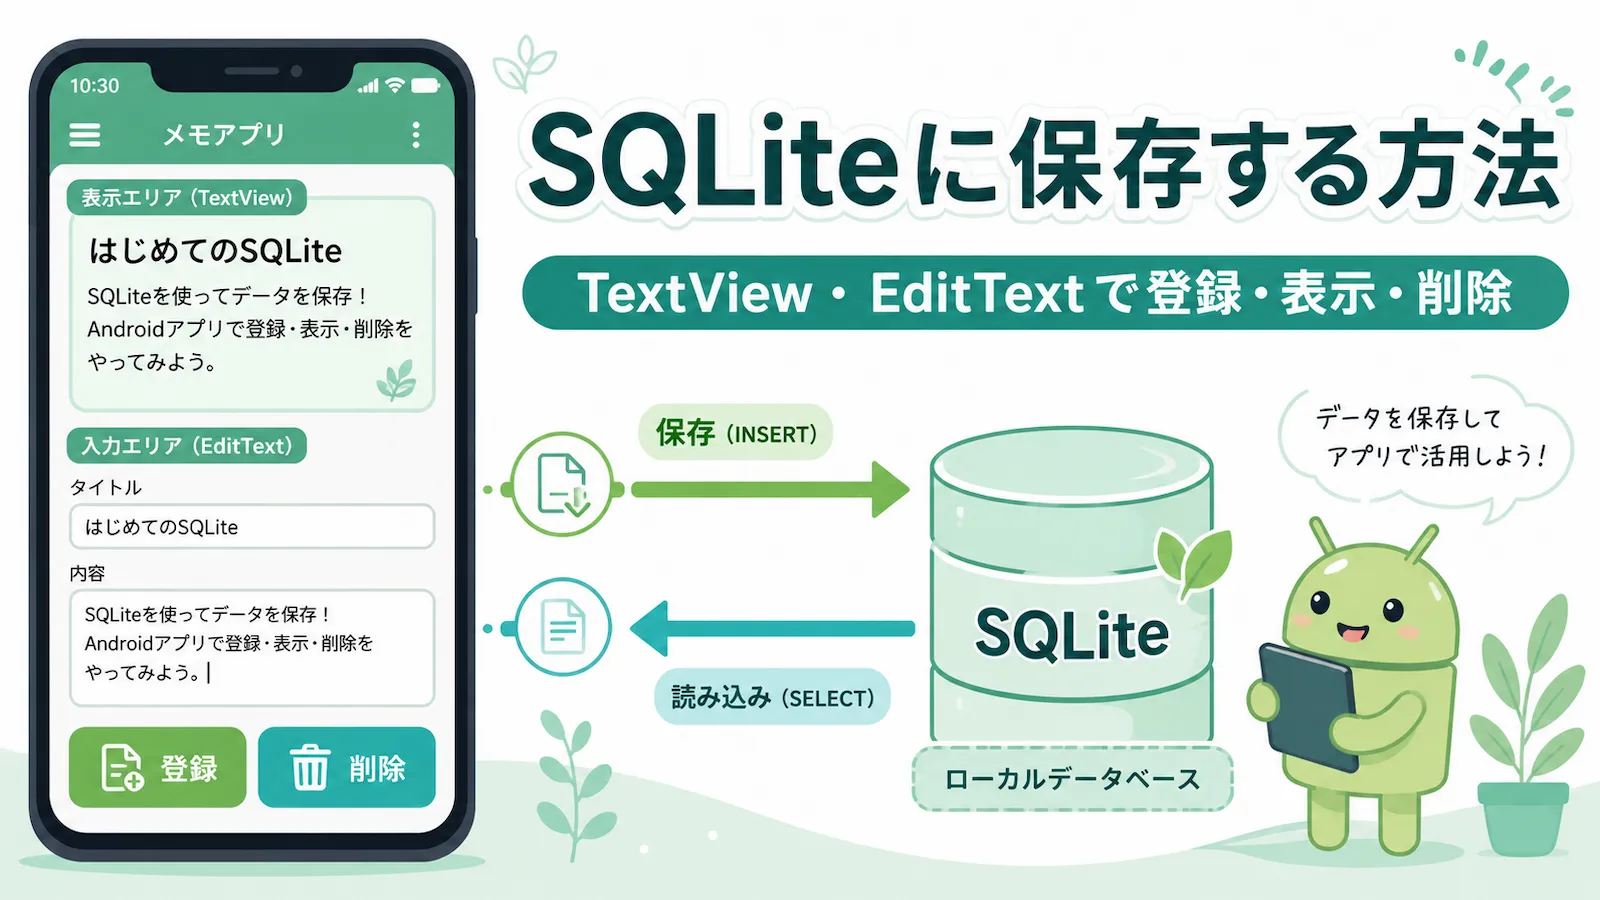
Android Studioのインストールや基本的な画面の見方、SQLiteに1件保存する基本形については、先にこちらの記事を読んでおくと進めやすいです。
構成
このアプリの主な構成は、次のようになります。
実際の構成図では、メイン画面、テキスト画面、アダプター、データベースヘルパー、リソースが次のようにつながっています。
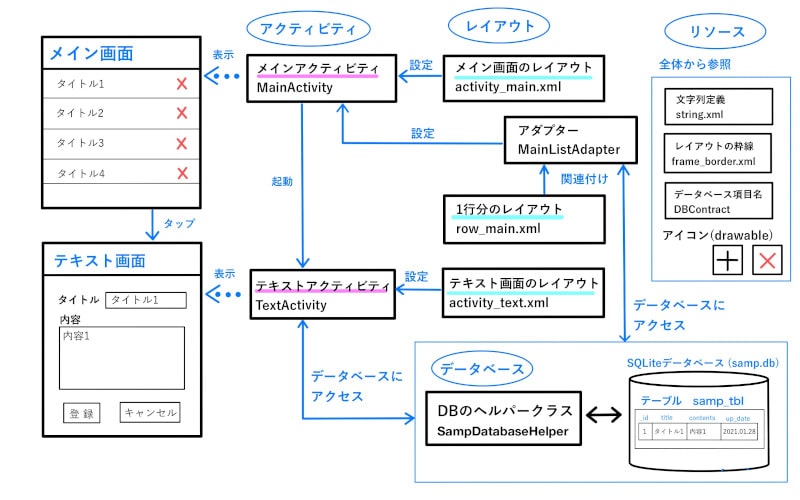
主な役割は次のとおりです。
- MainActivity:一覧画面を表示する
- activity_main.xml:一覧画面のレイアウトを定義する
- row_main.xml:ListViewの1行分のレイアウトを定義する
- MainListAdapter:データベースの検索結果をListViewに表示する
- TextActivity:登録・編集画面を表示する
- activity_text.xml:登録・編集画面のレイアウトを定義する
- SampDatabaseHelper:SQLiteデータベースの作成や操作を管理する
- DBContract:テーブル名やカラム名をまとめる
- strings.xml / drawable:文字列やアイコンなどを管理する
ListViewに表示するだけでなく、行タップで編集画面を開いたり、削除ボタンでデータベースの該当データを削除したりするため、いくつかのファイルが連携します。
プロジェクト作成
新しいプロジェクトは、前回の記事の「プロジェクト作成」の章と同じ流れで作成できます。
Android Studioをインストール|プロジェクト作成の章へ
今回のプロジェクト名は SampListView とします。
リソース準備
まずは、アプリ内で参照する文字列やアイコンを準備します。
strings.xml
app/res/values/strings.xml を開いて、次の内容に編集します。
<resources>
    <string name="app_name">SampListView</string>
    <string name="title">タイトル</string>
    <string name="contents">内容</string>
    <string name="reg">登録</string>
    <string name="del">削除</string>
    <string name="cancel">キャンセル</string>
</resources>
ここで定義した name を指定して、プログラムやレイアウトから参照します。
前回と同じファイル
次のファイルは、SQLiteに保存する基本編と同じ考え方で使います。
frame_border.xml:タイトルなどの入力欄に枠線を表示するDBContract:データベースのテーブル名や項目名を定義するSampDatabaseHelper:データベースヘルパークラス
まだ作成していない場合は、こちらの記事の該当部分を参考にしてください。
アイコンを追加する
このアプリでは、一覧画面で使う +アイコン と ×アイコン を追加します。
Vector Assetを追加する
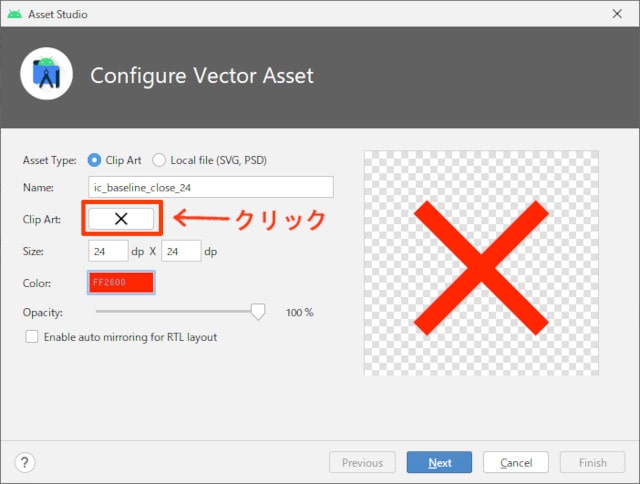
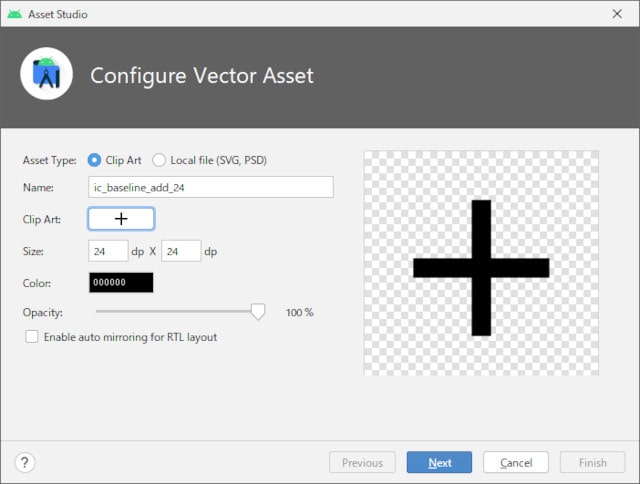
res/drawable/ を右クリックして、[New] → [Vector Asset] をクリックします。
削除用のアイコンを追加する場合は、「Clip Art」をクリックします。
Android Studioに用意されているアイコンの一覧が表示されるので、追加したいアイコンを選択します。
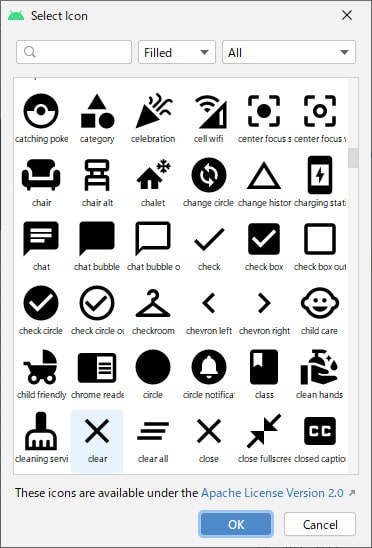
削除アイコンは、色を赤に変更して、[Next] → [Finish] の順に進めます。
プラスアイコンも同じように追加します。
Gradleのファイルに設定を追加する
アイコンを使えるようにするため、Gradle Scripts/build.gradle(Module) の defaultConfig に次の1行を追加します。
defaultConfig {
    vectorDrawables.useSupportLibrary = true
}
データベース作成
データベースの作成は、前回の記事と同じです。
DBContractでテーブル名やカラム名を定義するSampDatabaseHelperでSQLiteOpenHelperを継承するonCreate()でテーブルを作成する
詳細は、こちらの記事の「データベース作成」の部分を参考にしてください。
画面レイアウト
今回は、一覧表示用の画面と、登録・編集用の画面を作ります。
activity_main.xml:一覧画面row_main.xml:ListViewの1行分activity_text.xml:登録・編集画面
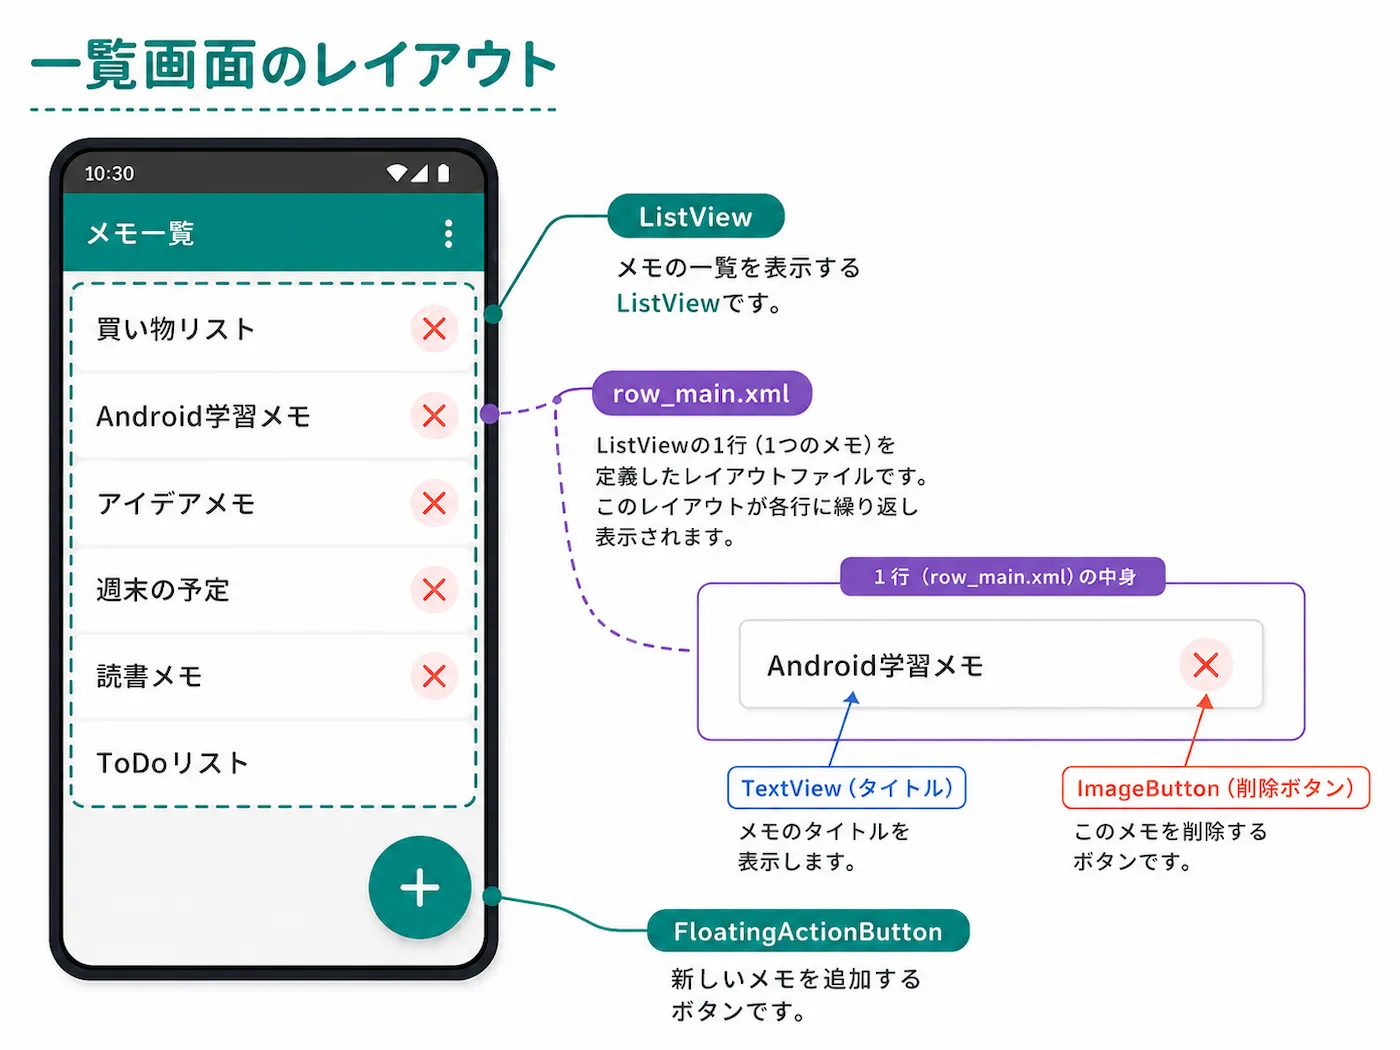
まずは全体のイメージを見ておきます。
activity_main.xml
app/res/layout/activity_main.xml に、メイン画面のレイアウトを設定します。
実際の一覧画面は、次のような見た目です。
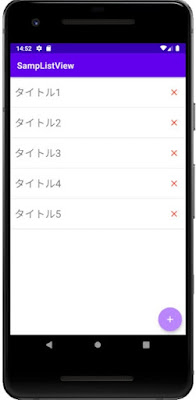
activity_main.xml の内容はこちらです。
activity_main.xml(クリックして表示)
<?xml version="1.0" encoding="utf-8"?>
<androidx.constraintlayout.widget.ConstraintLayout
    xmlns:android="http://schemas.android.com/apk/res/android"
    xmlns:app="http://schemas.android.com/apk/res-auto"
    android:layout_width="match_parent"
    android:layout_height="match_parent" >

    <ListView
        android:id="@+id/mainList"
        android:layout_width="match_parent"
        android:layout_height="match_parent"
        app:layout_constraintBottom_toBottomOf="parent"
        app:layout_constraintEnd_toEndOf="parent"
        app:layout_constraintStart_toStartOf="parent"
        app:layout_constraintTop_toTopOf="parent" />

    <com.google.android.material.floatingactionbutton.FloatingActionButton
        android:id="@+id/fab_reg"
        android:layout_width="wrap_content"
        android:layout_height="wrap_content"
        android:layout_marginBottom="8dp"
        android:layout_marginEnd="8dp"
        android:focusable="true"
        android:clickable="true"
        android:contentDescription="@string/reg"
        android:onClick="fab_reg_onClick"
        app:srcCompat="@drawable/ic_baseline_add_24"
        app:tint="@color/white"
        app:backgroundTint="@color/purple_200"
        app:layout_constraintBottom_toBottomOf="parent"
        app:layout_constraintEnd_toEndOf="parent" />

</androidx.constraintlayout.widget.ConstraintLayout>この画面では、ConstraintLayout の中に、ListView と FloatingActionButton を配置しています。
ConstraintLayout
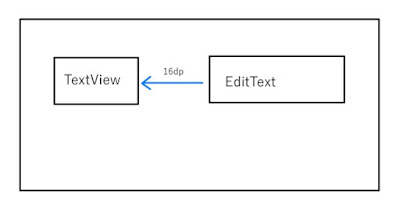
ConstraintLayout は、配置したウィジェットの上下左右などに 制約 を設定して、位置を決めるレイアウトです。
たとえば、次の図のように、TextViewとEditTextの位置関係を制約で指定できます。
このソースでは、ListViewを画面全体に配置し、FloatingActionButtonを右下に配置しています。
補足図で見ると、次のようなイメージです。
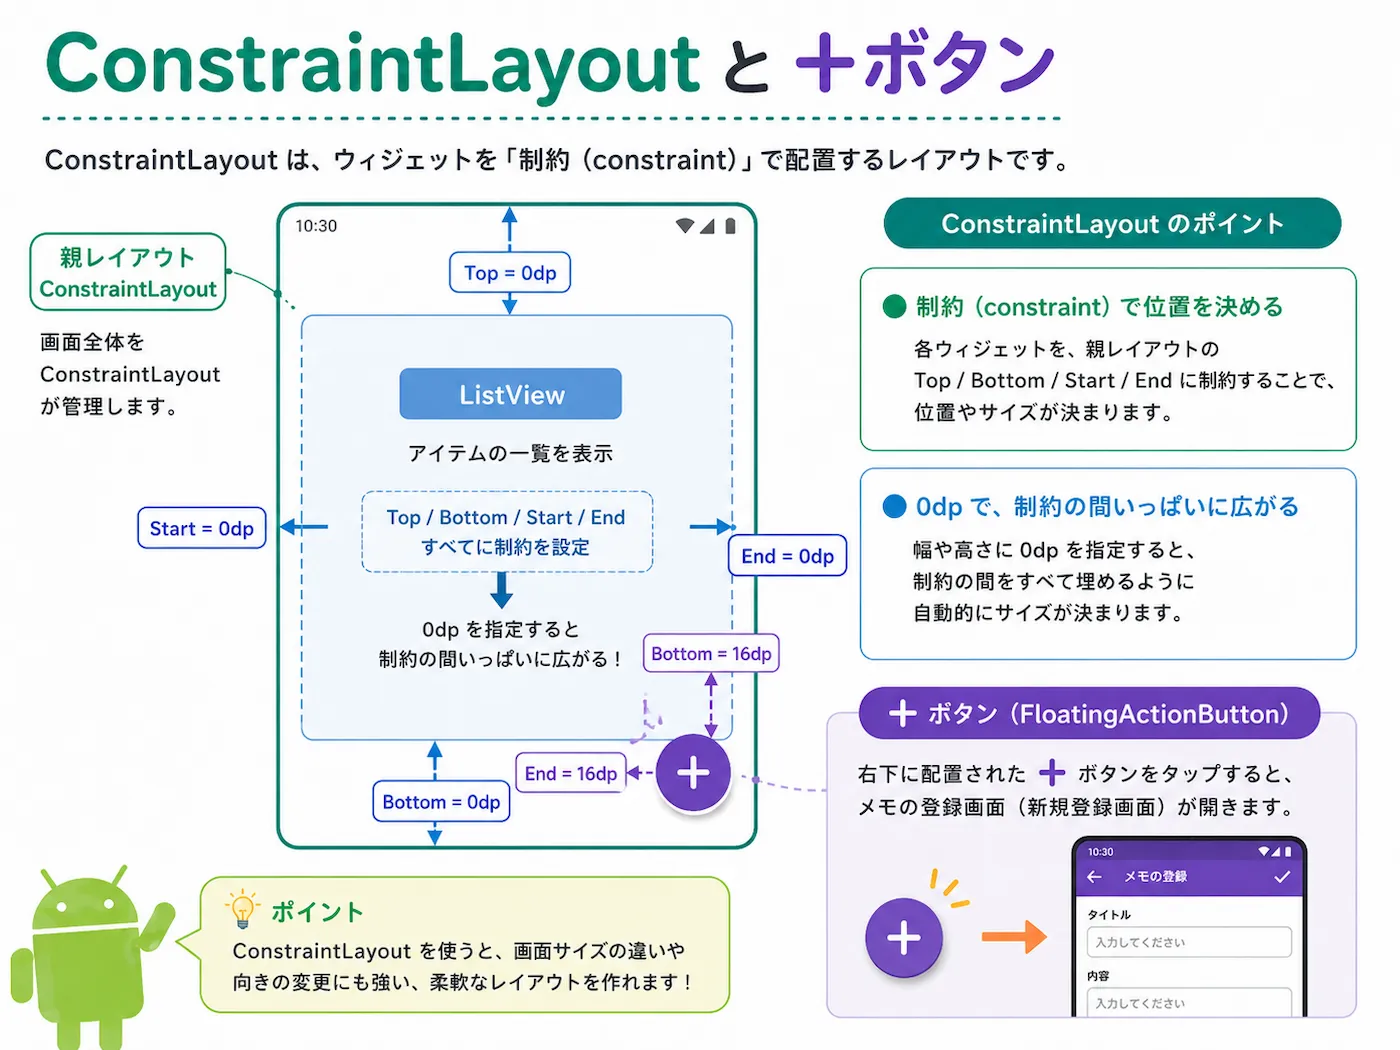
layout_width="0dp" のように指定すると、制約の間いっぱいにウィジェットを広げることができます。
FloatingActionButton
FloatingActionButtonは、右下に表示している丸い +ボタン のことです。
アプリでメインとなる操作を、このように円形のボタンで表示します。
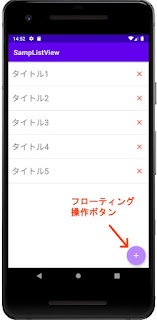
このソースでは、次のように指定することで、クリックされたときに MainActivity の fab_reg_onClick() メソッドを呼び出しています。
android:onClick="fab_reg_onClick"このメソッドで、登録画面を表示します。
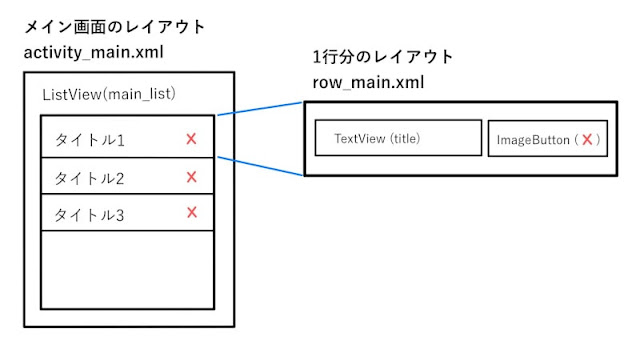
ListView
ListView は、データをリスト表示できるウィジェットです。
1行分の見た目は、row_main.xml で定義します。
row_main.xml
row_main.xml には、ListViewの1行分のレイアウトを定義します。
row_main.xml(クリックして表示)
<?xml version="1.0" encoding="utf-8"?>
<LinearLayout xmlns:android="http://schemas.android.com/apk/res/android"
    xmlns:app="http://schemas.android.com/apk/res-auto"
    android:layout_width="match_parent"
    android:layout_height="match_parent"
    android:descendantFocusability="blocksDescendants">

    <TextView
        android:id="@+id/title"
        android:layout_width="360dp"
        android:layout_height="70dp"
        android:gravity="center_vertical"
        android:paddingLeft="10dp"
        android:paddingRight="10dp"
        android:textSize="24sp" />

    <ImageButton
        android:id="@+id/button_delete"
        android:layout_width="50dp"
        android:layout_height="70dp"
        android:background="#00000000"
        android:contentDescription="@string/del"
        android:gravity="center_horizontal|center_vertical"
        android:onClick="btnDel_onClick"
        app:srcCompat="@drawable/ic_baseline_close_24" />

</LinearLayout>
この1行分のレイアウトには、次の2つを配置しています。
TextView:タイトルを表示するImageButton:削除ボタンを表示する
descendantFocusability
ListViewの中にImageButtonを置くと、ListViewの OnItemClickListener と、ボタン側のクリック処理が競合しやすくなります。
その状態を避けるため、親の LinearLayout に次の属性を設定しています。
android:descendantFocusability="blocksDescendants"これにより、行タップと削除ボタンのクリック処理を分けて扱いやすくなります。
activity_text.xml
次に、登録・編集用の画面を作ります。
実際の画面は、次のような見た目です。
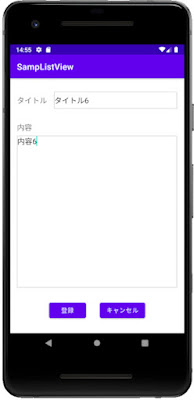
activity_text.xml の内容はこちらです。
activity_text.xml (クリックして表示)
<?xml version="1.0" encoding="utf-8"?>
<androidx.constraintlayout.widget.ConstraintLayout
    xmlns:android="http://schemas.android.com/apk/res/android"
    xmlns:app="http://schemas.android.com/apk/res-auto"
    android:layout_width="match_parent"
    android:layout_height="match_parent">

    <TextView
        android:id="@+id/textTitle"
        android:layout_width="wrap_content"
        android:layout_height="wrap_content"
        android:layout_marginStart="16dp"
        android:text="@string/title"
        android:textSize="18sp"
        app:layout_constraintBaseline_toBaselineOf="@+id/editTitle"
        app:layout_constraintEnd_toStartOf="@+id/editTitle"
        app:layout_constraintStart_toStartOf="parent" />

    <EditText
        android:id="@+id/editTitle"
        android:layout_width="0dp"
        android:layout_height="40dp"
        android:layout_marginEnd="16dp"
        android:layout_marginStart="16dp"
        android:layout_marginTop="32dp"
        android:background="@drawable/frame_border"
        android:hint="@string/title"
        android:importantForAutofill="no"
        android:inputType="text"
        app:layout_constraintEnd_toEndOf="parent"
        app:layout_constraintStart_toEndOf="@+id/textTitle"
        app:layout_constraintTop_toTopOf="parent" />

    <TextView
        android:id="@+id/textContents"
        android:layout_width="0dp"
        android:layout_height="wrap_content"
        android:layout_marginStart="16dp"
        android:layout_marginTop="40dp"
        android:text="@string/contents"
        android:textSize="18sp"
        app:layout_constraintStart_toStartOf="parent"
        app:layout_constraintTop_toBottomOf="@+id/textTitle" />

    <EditText
        android:id="@+id/editContents"
        android:layout_width="0dp"
        android:layout_height="360dp"
        android:layout_marginEnd="16dp"
        android:layout_marginStart="16dp"
        android:layout_marginTop="8dp"
        android:background="@drawable/frame_border"
        android:gravity="start|top"
        android:importantForAutofill="no"
        android:inputType="textMultiLine"
        android:labelFor="@id/textContents"
        app:layout_constraintEnd_toEndOf="parent"
        app:layout_constraintHorizontal_bias="1.0"
        app:layout_constraintStart_toStartOf="parent"
        app:layout_constraintTop_toBottomOf="@+id/textContents" />

    <Button
        android:id="@+id/btn_reg"
        android:layout_width="wrap_content"
        android:layout_height="wrap_content"
        android:layout_marginBottom="16dp"
        android:layout_marginEnd="16dp"
        android:layout_marginStart="100dp"
        android:layout_marginTop="16dp"
        android:onClick="btnReg_onClick"
        android:text="@string/reg"
        app:layout_constraintBottom_toBottomOf="parent"
        app:layout_constraintEnd_toStartOf="@+id/btn_cancel"
        app:layout_constraintStart_toStartOf="parent"
        app:layout_constraintTop_toBottomOf="@+id/editContents" />

    <Button
        android:id="@+id/btn_cancel"
        android:layout_width="wrap_content"
        android:layout_height="wrap_content"
        android:layout_marginBottom="16dp"
        android:layout_marginEnd="100dp"
        android:layout_marginStart="16dp"
        android:layout_marginTop="16dp"
        android:onClick="btnCancel_onClick"
        android:text="@string/cancel"
        app:layout_constraintBottom_toBottomOf="parent"
        app:layout_constraintEnd_toEndOf="parent"
        app:layout_constraintStart_toEndOf="@+id/btn_reg"
        app:layout_constraintTop_toBottomOf="@+id/editContents" />

</androidx.constraintlayout.widget.ConstraintLayout>
次の指定を入れることで、タイトルのラベルと入力欄のベースラインを合わせています。
app:layout_constraintBaseline_toBaselineOf="@+id/editTitle"マニフェストファイル
登録・編集画面である TextActivity を起動できるように、AndroidManifest.xml に次の記述を追加します。
<activity android:name=".TextActivity">
</activity>
アダプター(Adapter)
アダプターは、データとウィジェットを関連付けるための橋渡しをするオブジェクトです。
今回のアプリでは、SimpleCursorAdapter を継承して、MainListAdapter というアダプターを作成します。
SimpleCursorAdapter は、データベースの検索結果を保持する Cursor を渡すことで、ListViewの1行分のレイアウトにデータを関連付けてくれるアダプターです。
また、SimpleCursorAdapter に渡す Cursor には、_id という名前の列が含まれている必要があります。
今回のコードでは、MainListAdapter の中で、リストの何行目かという位置情報を、各行の削除ボタンにタグとして設定しています。
MainListAdapter
MainListAdapter (クリックして表示)
package com.example.samplistview;

import android.content.Context;
import android.database.Cursor;
import android.view.View;
import android.view.ViewGroup;
import android.widget.ImageButton;
import android.widget.SimpleCursorAdapter;

public class MainListAdapter extends SimpleCursorAdapter {

    // コンストラクタ
    public MainListAdapter(Context context, int layout, Cursor c, String[] from, int[] to, int flags) {
        super(context, layout, c, from, to, flags);
    }


    // 指定データのビューを取得
    @Override
    public View getView(int position, View convertView, ViewGroup parent) {
        View view = super.getView(position, convertView, parent);

        // 削除ボタン オブジェクトを取得
        ImageButton btnDel = (ImageButton) view.findViewById(R.id.button_delete);

        // ボタンにリスト内の位置を設定
        btnDel.setTag(position);

        return view;
    }

}
削除ボタンを押したときに、この tag から位置を取り出して、該当する行の _id を取得します。
アクティビティ
ここからは、一覧画面の MainActivity と、登録・編集画面の TextActivity を見ていきます。
MainActivity
MainActivity は、一覧画面の表示、行タップでの編集画面起動、削除ボタンでの削除処理、+ボタンでの新規登録画面起動を担当します。
MainActivity(クリックして表示)
package com.example.samplistview;

import android.os.Bundle;
import android.view.View;
import android.widget.ListView;
import android.widget.AdapterView;
import android.content.Intent;
import android.database.Cursor;
import android.database.sqlite.SQLiteDatabase;
import androidx.appcompat.app.AppCompatActivity;
import static com.ma_chanblog.samplistview.DBContract.DBEntry;

public class MainActivity extends AppCompatActivity {
    private SampDatabaseHelper helper = null;
    MainListAdapter sc_adapter;

    // アクティビティの初期化処理
    @Override
    protected void onCreate(Bundle savedInstanceState) {
        super.onCreate(savedInstanceState);
        setContentView(R.layout.activity_main);
    }

    // アクティビティの再開処理
    @Override
    protected void onResume() {
        super.onResume();
        // データを一覧表示
        onShow();
    }

    // データを一覧表示
    protected void onShow() {
        // データベースヘルパーを準備
        helper = new SampDatabaseHelper(this);
        // データベースを検索する項目を定義
        String[] cols = {DBEntry._ID, DBEntry.COLUMN_NAME_TITLE, DBEntry.COLUMN_NAME_CONTENTS };

        // 読み込みモードでデータベースをオープン
        // ※SimpleCursorAdapterでデータを使うため、ここではtry-with-resourcesを使わずに開いたままにします
        SQLiteDatabase db = helper.getReadableDatabase();

        // データベースを検索
        Cursor cursor = db.query(DBEntry.TABLE_NAME, cols, null, null, null, null, null, null);
        // 検索結果から取得する項目を定義
        String[] from = {DBEntry.COLUMN_NAME_TITLE};
        // データを設定するレイアウトのフィールドを定義
        int[] to = {R.id.title};
        // ListViewの1行分のレイアウト(row_main.xml)と検索結果を関連付け
        sc_adapter = new MainListAdapter(
                this, R.layout.row_main, cursor, from, to,0);
        // activity_main.xmlに定義したListViewオブジェクトを取得
        ListView list = findViewById(R.id.mainList);
        // ListViewにアダプターを設定
        list.setAdapter(sc_adapter);
        // リストの項目をクリックしたときの処理
        list.setOnItemClickListener(new AdapterView.OnItemClickListener() {
            public void onItemClick(AdapterView av, View view, int position, long id) {
                // クリックされた行のデータを取得
                Cursor cursor = (Cursor)av.getItemAtPosition(position);
                // テキスト登録画面 Activity へのインテントを作成
                Intent intent = new Intent(MainActivity.this, com.ma_chanblog.samplistview.TextActivity.class);
                intent.putExtra(DBEntry._ID, cursor.getInt(0));
                intent.putExtra(DBEntry.COLUMN_NAME_TITLE, cursor.getString(1));
                intent.putExtra(DBEntry.COLUMN_NAME_CONTENTS, cursor.getString(2));
                // アクティビティを起動
                startActivity(intent);
            }
        });
    }

    // 削除ボタン タップ時に呼び出されるメソッド
    public void btnDel_onClick(View view){
        // MainListAdapterで設定されたリスト内の位置を取得
        int pos = (Integer)view.getTag();
        // アダプターから、_idの値を取得
        int id = ((Cursor) sc_adapter.getItem(pos)).getInt(0);

        // データの削除は一瞬で終わるため、ここはtry-with-resourcesで安全にクローズします
        try (SQLiteDatabase db = helper.getWritableDatabase()) {
            db.delete(DBEntry.TABLE_NAME, DBEntry._ID+" = ?", new String[] {String.valueOf(id)});
        }
        // データを一覧表示(画面を更新)
        onShow();
    }

    // 「+」フローティング操作ボタン タップ時に呼び出されるメソッド
    public void fab_reg_onClick(View view) {
        // テキスト登録画面 Activity へのインテントを作成
        Intent intent = new Intent(MainActivity.this, com.ma_chanblog.samplistview.TextActivity.class);
        // アクティビティを起動
        startActivity(intent);
    }

    // アクティビティが破棄されるときに呼び出されるメソッド
    @Override
    protected void onDestroy() {
        super.onDestroy();
        // 開きっぱなしだったデータベースヘルパーを安全に閉じます
        if (helper != null) {
            helper.close();
        }
    }
}
onResume()
これまで使用してきたonCreate() メソッドは、アクティビティが開始されたときに、初期化処理として実行されるメソッドです。
今回は、メインの一覧画面から登録・編集画面を呼び出し、またメインの画面が復帰する流れになるため、フォアグラウンドになるときに呼び出されるonResume()メソッドでも、画面の再表示を行っています。
onCreate()やonResume()のようなアクティビティのライフサイクルについては、公式サイトで紹介されています。
onShow()
今回のコードでは、データを一覧表示する onShow() メソッドの中で、自動でデータベースを閉じる構文(try-with-resources)を使用していません。
SimpleCursorAdapter は取得した Cursor を利用して画面を表示するため、一覧表示中にデータベースや Cursor を閉じてしまうと、実装内容によってはエラーの原因になる場合があります。
そのため、今回はアプリの画面が完全に閉じられるタイミング(ライフサイクルの最後である onDestroy() メソッド内)で helper.close() を呼び出し、データベースをまとめてクローズする構成にしています。
(※なお、一瞬で処理が終わる「削除ボタン」の処理内では、その都度安全にクローズして問題ありません)
インテント(Intent)
インテントは、他のアクティビティに情報を受け渡すための入れ物(非同期メッセージ)です。
今回のアプリでは、MainActivityでリストがクリックされたときに、クリックされた行のIDやタイトルなどの情報をインテントにつめてTextActivity に送っています。
テキストアクティビティ
登録・編集用の画面を表示するテキストアクティビティです。
TextActivity(クリックして表示)
package com.example.samplistview;

import android.content.ContentValues;
import android.content.Intent;
import android.database.sqlite.SQLiteDatabase;
import android.os.Bundle;
import android.view.View;
import android.widget.EditText;
import androidx.appcompat.app.AppCompatActivity;
import static com.ma_chanblog.samplistview.DBContract.DBEntry;

public class TextActivity extends AppCompatActivity {
    private int id = 0;
    private EditText editTitle = null;
    private EditText editContents = null;

    @Override
    protected void onCreate(Bundle savedInstanceState) {
        super.onCreate(savedInstanceState);
        setContentView(R.layout.activity_text);

        // ビューオブジェクトを取得
        editTitle = findViewById(R.id.editTitle);
        editContents = findViewById(R.id.editContents);

        // インテントを取得
        Intent intent = getIntent();

        //intentのデータを取得(データがない場合、第2引数の 0 が返る)
        id = intent.getIntExtra(DBEntry._ID,0);
        String title = intent.getStringExtra(DBEntry.COLUMN_NAME_TITLE);
        String contents = intent.getStringExtra(DBEntry.COLUMN_NAME_CONTENTS);

        // データ更新の場合
        if (id > 0){
            editTitle.setText(title);
            editContents.setText(contents);
        }
    }

    // 「登録」ボタン タップ時に呼び出されるメソッド
    public void btnReg_onClick(View view) {

        // ヘルパーを準備
        SampDatabaseHelper helper = new SampDatabaseHelper(this);

        // 入力欄に入力されたタイトルとコンテンツを取得
        String title    = editTitle.getText().toString();
        String contents = editContents.getText().toString();

        // 書き込みモードでデータベースをオープン
        try (SQLiteDatabase db = helper.getWritableDatabase()) {

            // 入力されたタイトルとコンテンツをContentValuesに設定
            // ContentValuesは、項目名と値をセットで保存できるオブジェクト
            ContentValues cv = new ContentValues();
            cv.put(DBEntry.COLUMN_NAME_TITLE, title);
            cv.put(DBEntry.COLUMN_NAME_CONTENTS, contents);

            if(id == 0) {
                // データ新規登録
                db.insert(DBEntry.TABLE_NAME, null, cv);
            } else {
                // データ更新
                db.update(DBEntry.TABLE_NAME, cv, DBEntry._ID + " = ?", new String[] {String.valueOf(id)});
            }
        }

        // TextActivityを終了
        finish();
    }

    // 「キャンセル」ボタン タップ時に呼び出されるメソッド
    public void btnCancel_onClick(View view) {

        // TextActivityを終了
        finish();
    }

}
onResume()
onResume() は、アクティビティが前面に戻ってきたときに呼ばれます。
今回は、一覧画面から登録・編集画面を開き、戻ってきたときに最新のデータを表示したいので、onResume() で onShow() を呼んでいます。
@Override
protected void onResume() {
    super.onResume();
    onShow();
}
これにより、登録・編集が終わって一覧画面に戻ったタイミングで、データベースから再取得して表示し直せます。
Intent
Intent は、別のアクティビティに情報を渡すために使います。
今回のアプリでは、一覧の行をタップしたときに、その行の _id、タイトル、内容を TextActivity に渡しています。
intent.putExtra(DBEntry._ID, cursor.getInt(0));
intent.putExtra(DBEntry.COLUMN_NAME_TITLE, cursor.getString(1));
intent.putExtra(DBEntry.COLUMN_NAME_CONTENTS, cursor.getString(2));
この情報を受け取ることで、編集画面側で既存データを表示できます。
削除ボタンの処理
削除ボタンが押されたときの流れは次のようになります。
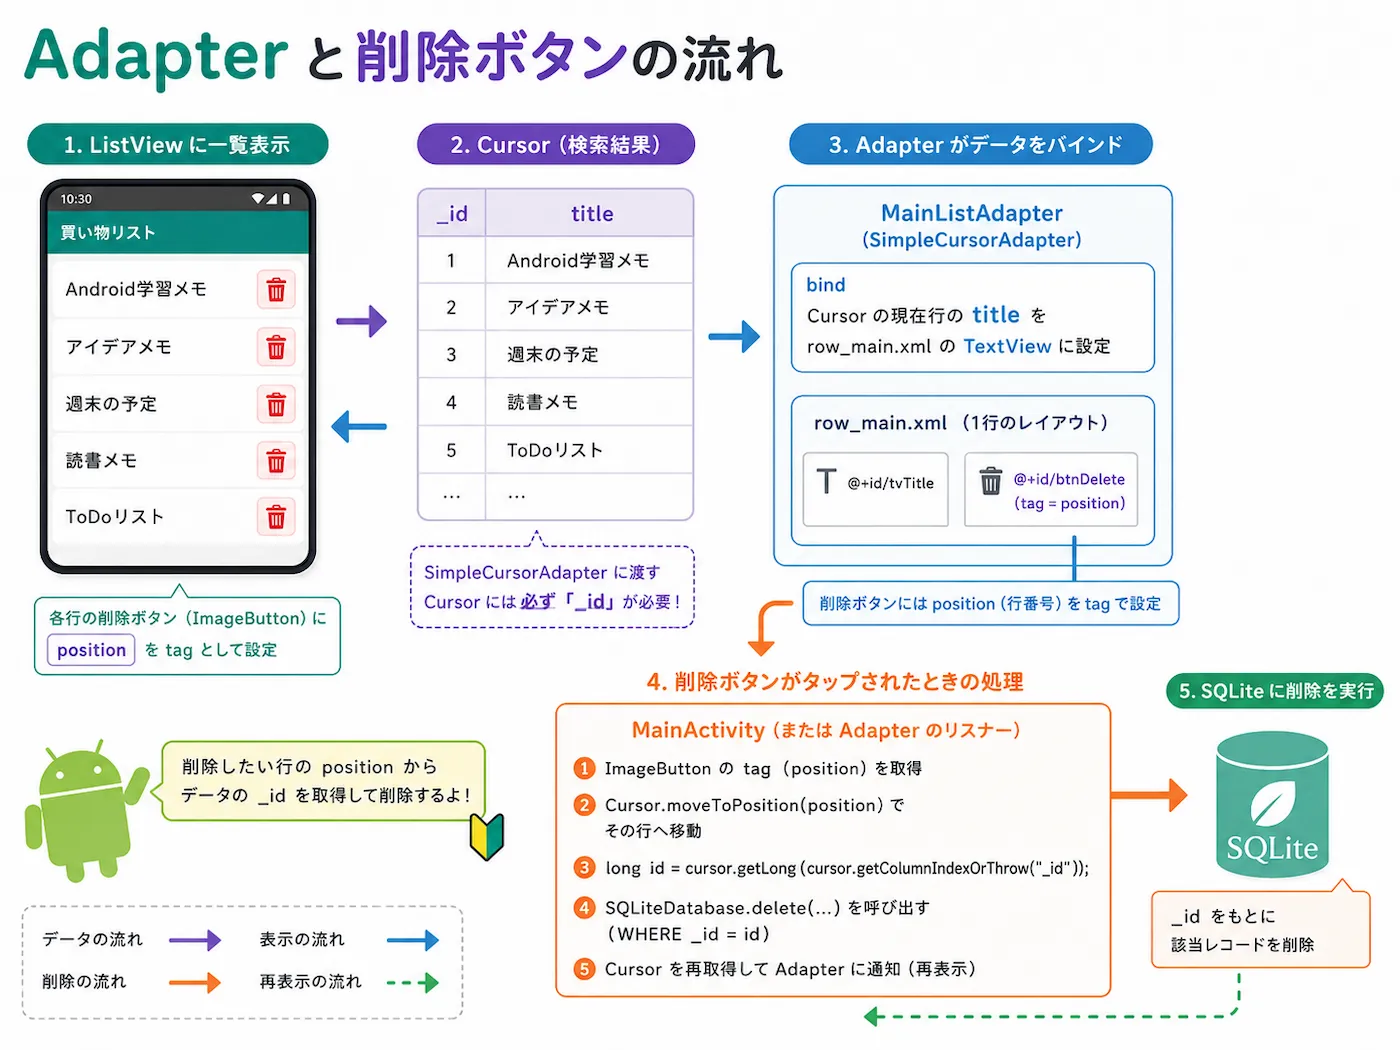
- 削除ボタンの
tagからpositionを取得する - positionを使って、アダプターから該当行のCursorを取得する
- Cursorから
_idを取り出す _idを条件にしてdelete()を実行するonShow()を呼んで一覧を再表示する
TextActivity
TextActivity は、登録・編集画面を表示して、データの新規登録や更新を行うアクティビティです。
TextActivity(クリックして表示)
package com.example.samplistview;

import android.content.ContentValues;
import android.content.Intent;
import android.database.sqlite.SQLiteDatabase;
import android.os.Bundle;
import android.view.View;
import android.widget.EditText;

import androidx.appcompat.app.AppCompatActivity;

import static com.ma_chanblog.samplistview.DBContract.DBEntry;

public class TextActivity extends AppCompatActivity {

    private int id = 0;
    private EditText editTitle = null;
    private EditText editContents = null;

    @Override
    protected void onCreate(Bundle savedInstanceState) {
        super.onCreate(savedInstanceState);
        setContentView(R.layout.activity_text);

        // ビューオブジェクトを取得
        editTitle = findViewById(R.id.editTitle);
        editContents = findViewById(R.id.editContents);

        // インテントを取得
        Intent intent = getIntent();

        // intentのデータを取得(データがない場合、第2引数の0が返る)
        id = intent.getIntExtra(DBEntry._ID, 0);
        String title = intent.getStringExtra(DBEntry.COLUMN_NAME_TITLE);
        String contents = intent.getStringExtra(DBEntry.COLUMN_NAME_CONTENTS);

        // データ更新の場合
        if (id > 0) {
            editTitle.setText(title);
            editContents.setText(contents);
        }
    }

    // 「登録」ボタン タップ時に呼び出されるメソッド
    public void btnReg_onClick(View view) {

        // ヘルパーを準備
        SampDatabaseHelper helper = new SampDatabaseHelper(this);

        // 入力欄に入力されたタイトルとコンテンツを取得
        String title = editTitle.getText().toString();
        String contents = editContents.getText().toString();

        // 書き込みモードでデータベースをオープン
        try (SQLiteDatabase db = helper.getWritableDatabase()) {

            // 入力されたタイトルとコンテンツをContentValuesに設定
            // ContentValuesは、項目名と値をセットで保存できるオブジェクト
            ContentValues cv = new ContentValues();
            cv.put(DBEntry.COLUMN_NAME_TITLE, title);
            cv.put(DBEntry.COLUMN_NAME_CONTENTS, contents);

            if (id == 0) {
                // データ新規登録
                db.insert(DBEntry.TABLE_NAME, null, cv);
            } else {
                // データ更新
                db.update(DBEntry.TABLE_NAME, cv, DBEntry._ID + " = ?", new String[] {String.valueOf(id)});
            }
        }

        // TextActivityを終了
        finish();
    }

    // 「キャンセル」ボタン タップ時に呼び出されるメソッド
    public void btnCancel_onClick(View view) {

        // TextActivityを終了
        finish();
    }
}
新規登録と更新の切り替え
TextActivity では、Intentから受け取った id の値で、新規登録か更新かを切り替えています。
if (id == 0) {
    db.insert(DBEntry.TABLE_NAME, null, cv);
} else {
    db.update(DBEntry.TABLE_NAME, cv, DBEntry._ID + " = ?", new String[] {String.valueOf(id)});
}
id == 0のとき:新規登録id > 0のとき:既存データの更新
という流れです。
処理が終わったら finish() でTextActivityを閉じます。
その後、MainActivityに戻ると onResume() が呼ばれ、一覧が再表示されます。
画面遷移と登録・編集・削除の流れ
ここまでの流れをまとめると、次のようになります。
新規登録の流れ
- MainActivityで+ボタンを押す
- TextActivityを開く
- タイトルと内容を入力する
- 登録ボタンを押す
- SQLiteに
INSERTする finish()で画面を閉じる- MainActivityに戻り、一覧を再表示する
編集の流れ
- MainActivityで一覧の行をタップする
- Intentで
_id、タイトル、内容をTextActivityに渡す - TextActivityに既存データを表示する
- 内容を変更して登録ボタンを押す
- SQLiteに
UPDATEする - MainActivityに戻り、一覧を再表示する
削除の流れ
- MainActivityで削除ボタンを押す
- 削除ボタンの
tagからpositionを取得する - positionから該当行の
_idを取得する - SQLiteに
DELETEを実行する - 一覧を再表示する
確認しておきたいところ
SimpleCursorAdapterでエラーになる
SimpleCursorAdapter に渡す Cursor に _id 列が含まれているか確認します。
今回のコードでは、次のように _ID を検索項目に入れています。
String[] cols = {DBEntry._ID, DBEntry.COLUMN_NAME_TITLE, DBEntry.COLUMN_NAME_CONTENTS };一覧タップと削除ボタンの動きがうまく分かれない
row_main.xml の親レイアウトに、次の指定が入っているか確認します。
android:descendantFocusability="blocksDescendants"ListViewの行タップと、ImageButtonのクリック処理が競合しやすいので、この指定が役に立ちます。
登録・編集後に一覧が更新されない
MainActivity の onResume() で onShow() を呼んでいるか確認します。
@Override
protected void onResume() {
    super.onResume();
    onShow();
}
登録・編集画面から戻ったタイミングで再表示するには、この流れが必要です。
まとめ
今回は、SQLiteデータベースの内容を ListViewに一覧表示 し、登録・編集・削除 を行う方法を紹介しました。
ポイントをまとめると、次のとおりです。
ListViewでデータベースの内容を一覧表示するrow_main.xmlで1行分の見た目を定義するSimpleCursorAdapterを継承したMainListAdapterで表示をつなぐ- 行タップでは
Intentを使って編集画面にデータを渡す - 削除ボタンでは
_idを使ってSQLiteから該当データを削除する - 登録・編集後は
onResume()で一覧を再表示する
ListViewとSQLiteを組み合わせると、保存したデータを一覧で扱えるようになります。
このあとRecyclerViewを使った一覧表示に進むと、さらに柔軟なリスト操作も試しやすくなります。
こちらは、関連記事です。